Welcome to our Knowledge Base
-
System Settings
-
- System Settings Getting Started (Video)
- Upload Students (Video)
- Upload Students
- Upload Student Pictures
- User Permissions
- SFTP Automated Student Rosters
- Microsoft Single Sign-On (SSO)
- Safari Web Browser
- System Requirements
- Whitelist URL's
- Spirit Point Reward Tracking
- Google Single Sign-On (SSO)
- Status
- Automated Intervention Extract
-
- Upload User Accounts
- User Accounts
- Upload Students
- Upload Students (Video)
- Upload Student Pictures
- User Permissions
- Manage Family and Guests
- Mass Updates
- Manage Students
- Microsoft Single Sign-On (SSO)
- Preparing for Next School Year
- Printer Setup - 3" Thermal (Windows)
- Printer Setup - 3" Thermal (Mac) **Advanced Setup**
- Printer Setup - 3" Thermal Network (Mac) **Advanced Setup**
- Google Single Sign-On (SSO)
- Classlink
- District Admin
- Show all articles (2) Collapse Articles
-
-
Store
-
- Changing Payment Type After Transaction has Completed
- Creating a Transaction
- E-mail Receipts
- Exporting Ticket Sales from Store to Ticketing for Checkin
- Modify Transaction - Post Sale
- Payment Type
- PAX Credit Card Reader Setup
- Portal Purchased Product Pickup and Reports
- Product Buttons
- Printing Receipts
- ProPay: How to Process Credit Cards
- ProPay: How to Void a Transaction
- Scanning a Student ID
- Returns
- Reprint Receipt and Resend Receipt by E-mail
- Student Credit
- Student Credit - Credit Refunds
- Discount Options
- Convenience Fee
- Student Alerts
- Show all articles (5) Collapse Articles
-
- Manage Products
- Barcodes
- Categories
- Configure your Portal and Products
- Inventory
- Mass Product Updates
- Mass Product Update (Video)
- Product History (Link on Current Transaction)
- Product Groups
- Product Agreement
- Store Importing Products
- Vendors
- Account Codes
- Duplicate Product
- Store Imports
- Student Alerts
- Show all articles (1) Collapse Articles
-
- Family and Guest Management
- Manage Spirit Points
- Manage Students
- Manage Family and Guests
- Mass Updates
- Student Credit
- Student Credit - Credit Refunds
- Discount Options
- Student Type
- Managing Student Credit
- Student Spirit Points
- Upload Students
- Upload Student Credit
- Upload Student Pictures
- Upload Students (Video)
- Add Students
- Student Negative Account Balance
- Student Alerts
- Show all articles (3) Collapse Articles
-
- Accessing the Student Only Store Portal
- Accessing the Open Store Portal
- Configure your Portal and Products
- Family and Guest Management
- Google Single Sign-On (SSO)
- Family Portal
- ProPay (Heartland) Merchant Account
- Manage Family and Guests
- Microsoft Single Sign-On (SSO)
- Portal Purchased Product Pickup and Reports
- Convenience Fee
-
- Accessing the Student Only Store Portal
- Accessing the Open Store Portal
- Configure your Portal and Products
- Cash Drawer (Connected to Thermal Printer)
- Cash Drawer (USB) Windows 10
- ProPay (Heartland) Merchant Account
- My Account
- PAX Credit Card Reader Setup
- Portal Purchased Product Pickup and Reports
- Product History (Link on Current Transaction)
- Product Agreement
- SFTP Automated Student Rosters
- School Logo
- Taxes
- User Accounts
- User Permissions
- Upload User Accounts
- Whitelist URL's
- Pay Open Invoice by Credit Card
- Account Codes
- Renewal
- Store Imports
- Show all articles (7) Collapse Articles
-
- System Settings Getting Started (Video)
- Mass Updates
- ProPay (Heartland) Merchant Account
- PAX Credit Card Reader Setup
- Google Single Sign-On (SSO)
- Microsoft Single Sign-On (SSO)
- School Logo
- User Accounts
- Preparing for Next School Year
- Remote Support
- Upload Student Pictures
- User Permissions
- Upload User Accounts
- Convenience Fee
- Classlink
- Account Codes
- Show all articles (1) Collapse Articles
-
Voting
-
- Adding an Election
- Adding Candidates
- Adding Officer Positions
- Adding Pictures and Biographies
- Archive and Retrieve Old Elections
- Create a Survey (Video)
- Election Layout Options
- Duplicate an Election
- Election Preflight
- Preview an Election
- Removing Candidates
- Using Video Biographies
- Write-in Candidates
- Rank Choice Voting
-
- Configure the Student Login Page
- Hobbies and Biography
- My Account
- Notifications for Unsuccessful Student Login Attempts
- Require Student E-mail
- Require Change Passwords
- SFTP Automated Student Rosters
- School Logo
- User Accounts
- User Permissions
- Upload User Accounts
- Whitelist URL's
- Pay Open Invoice by Credit Card
- Renewal
-
Ticketing
-
- Add Event
- Ticketing Attendance Report
- Check-In
- Display all Events
- Event Types
- Exporting Ticket Sales from Store to Ticketing for Checkin
- Mobile Check-in
- Pre-load Event
- Spirit Point Reward Tracking
- Sell Tickets
- Ticket and Check-in
- Link Store Ticket Sales to Ticketing 4 Schools
- Sell Tickets (New)
- Duplicate Event
-
- System Settings Getting Started (Video)
- Mass Updates
- ProPay (Heartland) Merchant Account
- Microsoft Single Sign-On (SSO)
- Google Single Sign-On (SSO)
- Upload Student Pictures
- User Accounts
- User Permissions
- Upload User Accounts
- School Logo
- Preparing for Next School Year
- Remote Support
- Classlink
- Convenience Fee
-
Interventions
-
- Bell Schedules
- Interventions
- Mass Updates
- My Account
- Printer Setup - 3" Thermal (Windows)
- Printer Setup - 3" Thermal (Mac) **Advanced Setup**
- Printer Setup - 3" Thermal Network (Mac) **Advanced Setup**
- SFTP Automated Student Rosters
- School Logo
- User Accounts
- User Permissions
- Upload User Accounts
- Whitelist URL's
- Pay Open Invoice by Credit Card
- Renewal
- Automated Intervention Extract
- Show all articles (1) Collapse Articles
-
Announcements
-
Student / Family Portal
-
Digital ID
Printer Setup – 3″ Thermal (Mac) **Advanced Setup**
*** CUPS which is what is needed to go through this process has been broken on newer MACS. This might not work with newer MACS running 14.***
The process for setting up a printer on a Mac is very technical. The steps below are documented clearly, but if you have IT staff on your campus we recommend that you have them go through this process.
Java
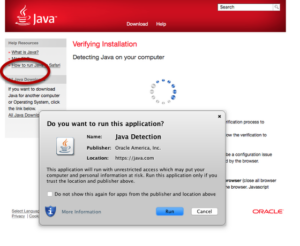
Visit http://java.com/verify/ to confirm Java is installed and running properly. You must be on Firefox or Safari browser to confirm the same.
-
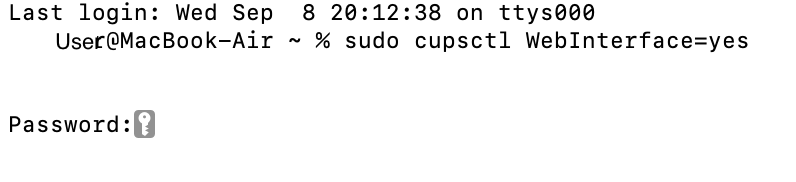
To enable CUPS web interface, copy the code below and paste it into the terminal window:
sudo cupsctl WebInterface=yes
-
Click Enter and then type in your computer password. The password key Icon will disappear and your computer name will show up with ~ %. You can then close this Terminal window as it is not needed anymore.
Open a Terminal window: ⌘+space, terminal, enter. Enable CUPS web interface by entering this into the Terminal: sudo cupsctl WebInterface=yes
CUPS
-
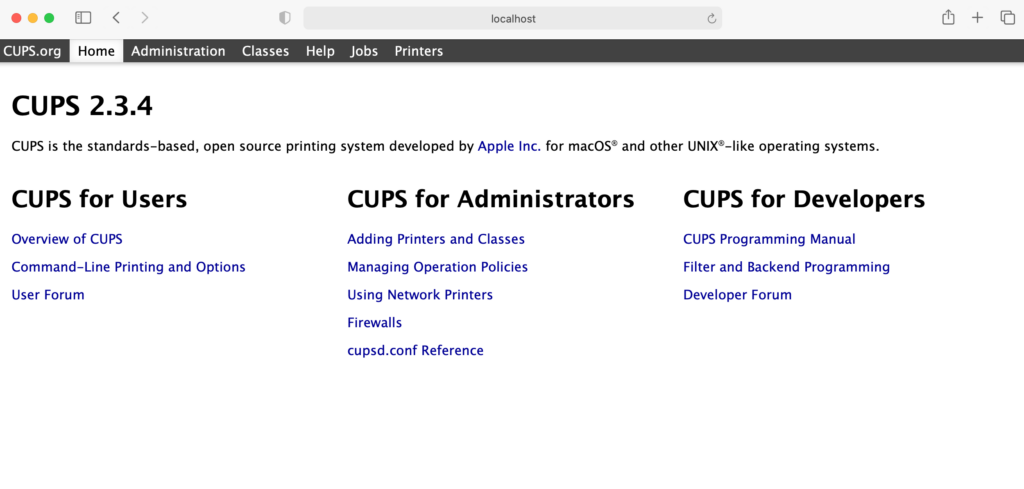
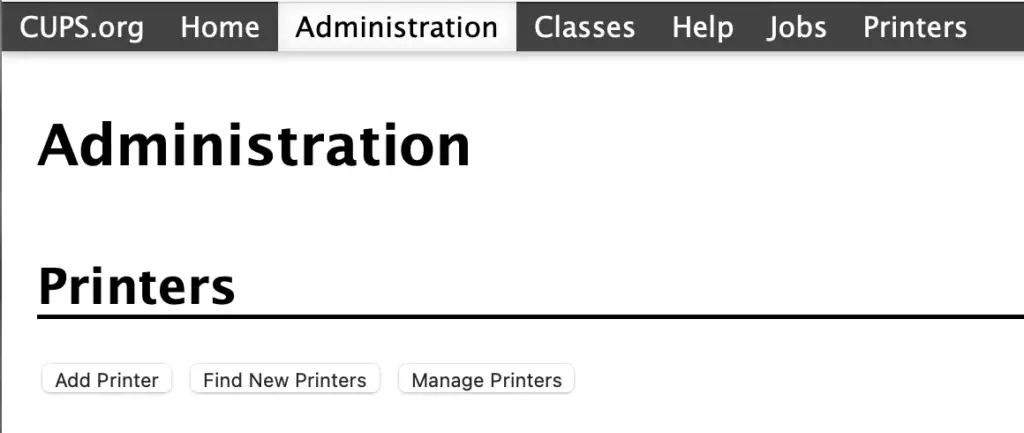
Open the Safari browser to the CUPS web interface http://localhost:631 and click The Administration tab, then Add Printer.
-
Next open Safari web browser and enter the following URL:
http://localhost:631
The Administration tab, then Add Printer.
1. You will be prompted for a port For USB printers type:
2. Go back to your Terminal and type
lpinfo -v |grep usb
3. Your results should look like one of the following.
usb://CITIZEN/CT-S2000?serial=00000000
usb://Zebra/LP2844?location=1a200000
usb://CUSTOM%20Engineering/K3?serial=K3_PRN_Num.:_0
4. If it has a location, please leave that off so in the examples above you would use one of the following.
usb://CITIZEN/CT-S2000
usb://Zebra/LP2844
usb://CUSTOM%20Engineering/K3
Connection
Copy and paste into the Connection: text box.
Printer Name
1. Enter an appropriate Name, Description and Location for your printer. If Citizen or Zebra, you can still use the same naming convention as above. Do not share the printer.
2. Click Continue.
Printer Manufacture
Select: Raw and click Continue.
Summary
You will now see a summary of your settings, click Click Add Printer.
Banners
Starting Banner: none
Ending Banner: none
Click Set Default Options
Add Class
Now we need to add a Printer Class to make the printer appear in System Preferences, Print & Scan.
Under the Administration tab click Add Class
1. You might be prompted for a user name and password. This is your computer Admin login user name and password.
Note: If you see your USB raw printer in the listing DO NOT select it.
2. Select AppSocket/HP JetDirect.
3. Click Continue.
Add Class Info
Enter a Name, Description, and Location for your class. It must be different from the raw printer name chosen previously. Also The class name may only contain up to 127 printable characters and may not contain spaces, slashes (/), or the pound sign (#).
Important here you will need to make a change. We default the printer name in your application so you will need to make sure you update the name in the application to match what you put here.
We suggest just CTS2000
In Members, Select the printer name you created previously
Click Add Class.
Go to your System Preferences, Printers & Scanners and you should see your new printer here. You can change the printer name, but this must match what is in your application under printer name.
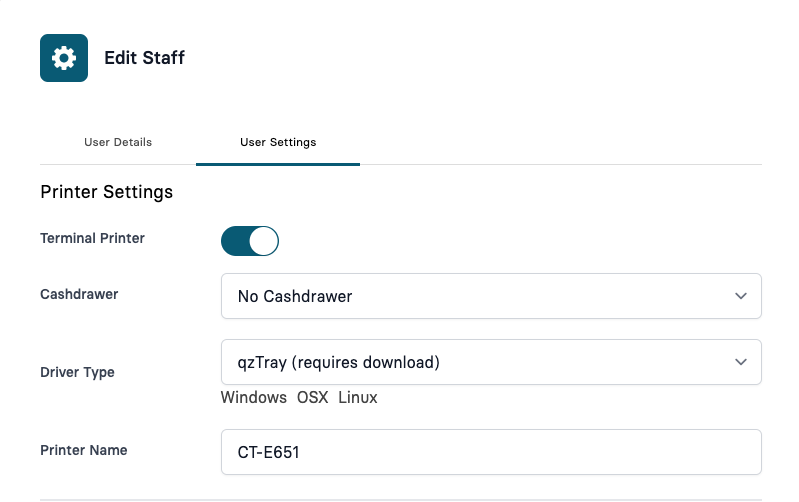
Printer Settings in Software 4 Schools

-
Click Users button available at the top bar.
-
Select the tab for User Settings and at the top will be the printer settings.
-
Turn on the Terminal Printer toggle.
-
If using a cash drawer with your printer choose the option “Cash drawer with thermal printer”. If no cash drawer use the “No Cash Drawer” option.
-
Just below the Driver Type there are three links. Windows, OSX or Linux. You will need to download and install the OSX application as seen in the next steps.
-
Type the name of your printer exactly how you have it in your computer printer settings.
Add a new user or Edit a current user
-
Click on the System Settings button.
To access printer settings you must be the account owner. If you do not see System Settings on the bottom left of your screen please contact your account owner.
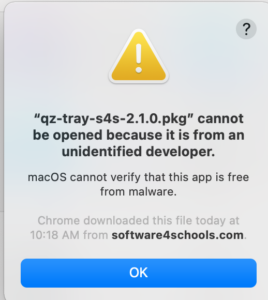
Install qzTray
Install qzTray
-
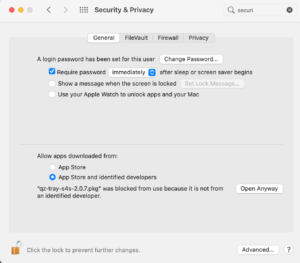
If you receive an alert when trying to install, you will need to go to Mac System Preferences / Security & Privacy
Install the OSX application called QZ-tray.
-
Click Open Anyway and install QZ-tray
System Preferences / Security & Privacy
QZ-tray
QZ-tray
-
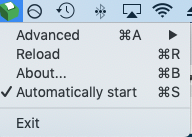
Click the printer icon and set to Automatically Start so the application will always be running on this computer.
You will now see QZ-tray show up on your top bar menu. It is a small green box with a white piece of paper coming out of it.
Printing
Printing
-
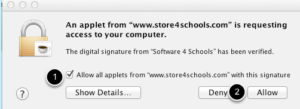
1. Check the box that says Allow all applets from “www.store4schools.com” with this signature. (Image from FireFox, may look different on other browsers).
-
Click Allow. You should now be able to print.
The first time you try to print from the application you will give you a system prompt / popup. It looks different depending on your Mac OS and browser, but when you see this option, make sure you check the box for “Allow all apps”, so you don’t see this warning again.