Welcome to our Knowledge Base
-
System Settings
-
- System Settings Getting Started (Video)
- Upload Students (Video)
- Upload Students
- Upload Student Pictures
- User Permissions
- SFTP Automated Student Rosters
- Microsoft Single Sign-On (SSO)
- Safari Web Browser
- System Requirements
- Whitelist URL's
- Spirit Point Reward Tracking
- Google Single Sign-On (SSO)
- Status
- Automated Intervention Extract
-
- Upload User Accounts
- User Accounts
- Upload Students
- Upload Students (Video)
- Upload Student Pictures
- User Permissions
- Manage Family and Guests
- Mass Updates
- Manage Students
- Microsoft Single Sign-On (SSO)
- Preparing for Next School Year
- Printer Setup - 3" Thermal (Windows)
- Printer Setup - 3" Thermal (Mac) **Advanced Setup**
- Printer Setup - 3" Thermal Network (Mac) **Advanced Setup**
- Google Single Sign-On (SSO)
- Classlink
- District Admin
- Show all articles (2) Collapse Articles
-
-
Store
-
- Changing Payment Type After Transaction has Completed
- Creating a Transaction
- E-mail Receipts
- Exporting Ticket Sales from Store to Ticketing for Checkin
- Modify Transaction - Post Sale
- Payment Type
- PAX Credit Card Reader Setup
- Portal Purchased Product Pickup and Reports
- Product Buttons
- Printing Receipts
- ProPay: How to Process Credit Cards
- ProPay: How to Void a Transaction
- Scanning a Student ID
- Returns
- Reprint Receipt and Resend Receipt by E-mail
- Student Credit
- Student Credit - Credit Refunds
- Discount Options
- Convenience Fee
- Student Alerts
- Show all articles (5) Collapse Articles
-
- Manage Products
- Barcodes
- Categories
- Configure your Portal and Products
- Inventory
- Mass Product Updates
- Mass Product Update (Video)
- Product History (Link on Current Transaction)
- Product Groups
- Product Agreement
- Store Importing Products
- Vendors
- Account Codes
- Duplicate Product
- Store Imports
- Student Alerts
- Show all articles (1) Collapse Articles
-
- Family and Guest Management
- Manage Spirit Points
- Manage Students
- Manage Family and Guests
- Mass Updates
- Student Credit
- Student Credit - Credit Refunds
- Discount Options
- Student Type
- Managing Student Credit
- Student Spirit Points
- Upload Students
- Upload Student Credit
- Upload Student Pictures
- Upload Students (Video)
- Add Students
- Student Negative Account Balance
- Student Alerts
- Show all articles (3) Collapse Articles
-
- Accessing the Student Only Store Portal
- Accessing the Open Store Portal
- Configure your Portal and Products
- Family and Guest Management
- Google Single Sign-On (SSO)
- Family Portal
- ProPay (Heartland) Merchant Account
- Manage Family and Guests
- Microsoft Single Sign-On (SSO)
- Portal Purchased Product Pickup and Reports
- Convenience Fee
-
- Accessing the Student Only Store Portal
- Accessing the Open Store Portal
- Configure your Portal and Products
- Cash Drawer (Connected to Thermal Printer)
- Cash Drawer (USB) Windows 10
- ProPay (Heartland) Merchant Account
- My Account
- PAX Credit Card Reader Setup
- Portal Purchased Product Pickup and Reports
- Product History (Link on Current Transaction)
- Product Agreement
- SFTP Automated Student Rosters
- School Logo
- Taxes
- User Accounts
- User Permissions
- Upload User Accounts
- Whitelist URL's
- Pay Open Invoice by Credit Card
- Account Codes
- Renewal
- Store Imports
- Show all articles (7) Collapse Articles
-
- System Settings Getting Started (Video)
- Mass Updates
- ProPay (Heartland) Merchant Account
- PAX Credit Card Reader Setup
- Google Single Sign-On (SSO)
- Microsoft Single Sign-On (SSO)
- School Logo
- User Accounts
- Preparing for Next School Year
- Remote Support
- Upload Student Pictures
- User Permissions
- Upload User Accounts
- Convenience Fee
- Classlink
- Account Codes
- Show all articles (1) Collapse Articles
-
Voting
-
- Adding an Election
- Adding Candidates
- Adding Officer Positions
- Adding Pictures and Biographies
- Archive and Retrieve Old Elections
- Create a Survey (Video)
- Election Layout Options
- Duplicate an Election
- Election Preflight
- Preview an Election
- Removing Candidates
- Using Video Biographies
- Write-in Candidates
- Rank Choice Voting
-
- Configure the Student Login Page
- Hobbies and Biography
- My Account
- Notifications for Unsuccessful Student Login Attempts
- Require Student E-mail
- Require Change Passwords
- SFTP Automated Student Rosters
- School Logo
- User Accounts
- User Permissions
- Upload User Accounts
- Whitelist URL's
- Pay Open Invoice by Credit Card
- Renewal
-
Ticketing
-
- Add Event
- Ticketing Attendance Report
- Check-In
- Display all Events
- Event Types
- Exporting Ticket Sales from Store to Ticketing for Checkin
- Mobile Check-in
- Pre-load Event
- Spirit Point Reward Tracking
- Sell Tickets
- Ticket and Check-in
- Link Store Ticket Sales to Ticketing 4 Schools
- Sell Tickets (New)
- Duplicate Event
-
- System Settings Getting Started (Video)
- Mass Updates
- ProPay (Heartland) Merchant Account
- Microsoft Single Sign-On (SSO)
- Google Single Sign-On (SSO)
- Upload Student Pictures
- User Accounts
- User Permissions
- Upload User Accounts
- School Logo
- Preparing for Next School Year
- Remote Support
- Classlink
- Convenience Fee
-
Interventions
-
- Bell Schedules
- Interventions
- Mass Updates
- My Account
- Printer Setup - 3" Thermal (Windows)
- Printer Setup - 3" Thermal (Mac) **Advanced Setup**
- Printer Setup - 3" Thermal Network (Mac) **Advanced Setup**
- SFTP Automated Student Rosters
- School Logo
- User Accounts
- User Permissions
- Upload User Accounts
- Whitelist URL's
- Pay Open Invoice by Credit Card
- Renewal
- Automated Intervention Extract
- Show all articles (1) Collapse Articles
-
Announcements
-
Student / Family Portal
-
Digital ID
Upload Students
In this article, you will learn how to upload students into the Voting database. Follow the instructions below.
You must have Super User or App Owner permission level to upload students into the application.
Prepare your Excel / CSV File Format
To upload students into our system you will need to provide either a .csv or .xlsx file. Our system will not import ..xls file (which comes from the older versions of Microsoft Excel). If using a .xlsx file be sure that there is only 1 tab of data on the file.
Possible Fields to upload
Required
- Student ID
- First Name
- Last Name
- Grade Level
Optional
- Portal Password (All products)
- Email (All products)
- Voting group (Voting)
- Last Period Location (Interventions)
Upload Students File

-
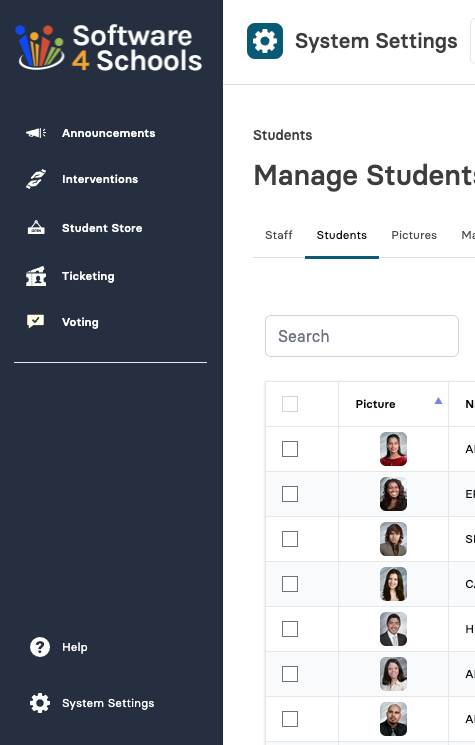
Click on System Settings
-
Next click Students to access Student Upload Feature

-
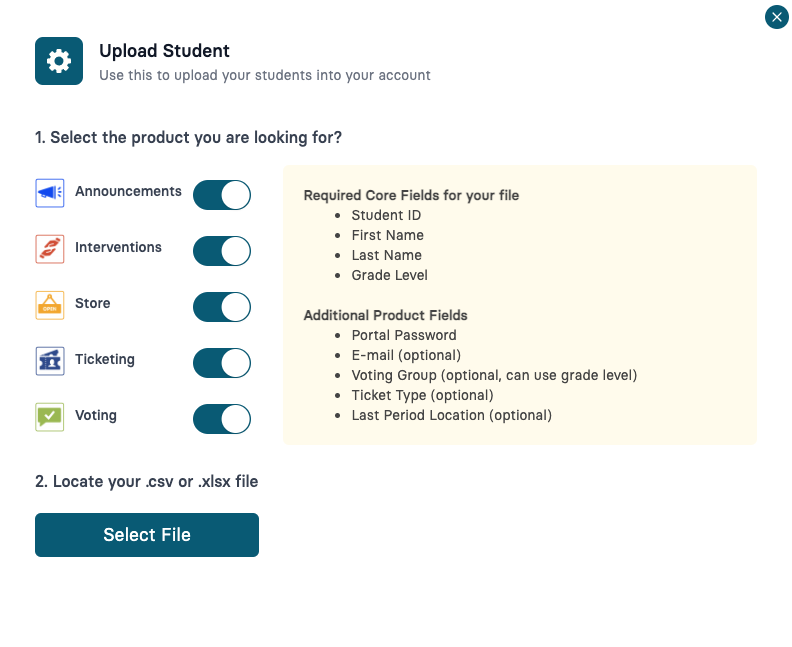
Next click on Upload Students

-
Select products to upload for
-
Be sure your file contains the following fields
-
Select File to locate and move into column mapping step.
In this next step you are going to choose what modules you are uploading students for. By default all modules you own will be turned on, click the switch to light gray to turn them off.
Column Mapping

-
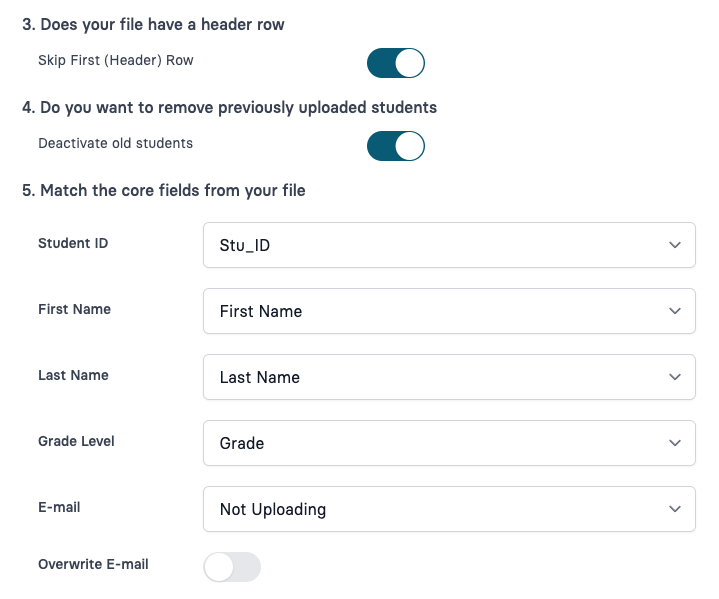
Does your file have a header row
Does your file have (for example First Name, Last Name, etc.) If so leave this on. If the first row is an actual student, then turn this off.
-
Do you want to remove previously added students
This will deactivate all students and then activate those students that are on your file as well as add new students from your file. If you are only uploading one file you will want to leave this on. The only reason you would want to turn this off is if you are uploading multiple files to put students into specific voting or ticketing groups that are not on your file.
-
Match the core fields from your file
Next you will match the left column with your data so we bring your data into the correct fields in our system. -
Email / Orverwrite Email
If you have student Email addresses in your file, you can select the correct column. The option to Overwrite Email is if you want to replace the email on the file with what they have currently in the system.
Next you need to select the options and align the dropdown menus.

-
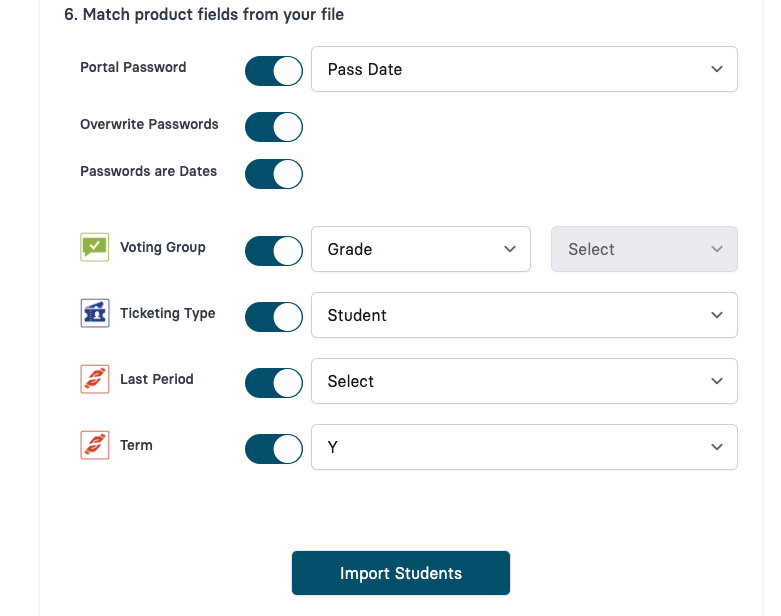
Portal Password – If you are uploading a password that is on your file, select the correct field here.
-
Overwrite Password – If your students have changed their password and you don’t want to reset it, turn off Overwrite password. The image above has it turned on and will change their password to what is on the file even if they have changed it.
Passwords are Dates – If you are importing a date as a password, for example using the student birthday is a good way to get students into the system, please turn this on. That will format all dates no matter what format they are in, into single digit day, single digit month and 4 digit year with slashes. M/D/YYYY (5/9/1989)
-
Voting Groups – You have 2 options here. first option is to use a column from your file. Typically voting groups are grade level, but they can be any option you choose. If grade level, that would allow you to seperate who can vote by grades. The second option is “Selected Voting Groups” which allows you to put all the students loaded into a specific voting group from the second drop down option.
-
Ticketing Type – By default you will want to load your students as “Students” but you can also load a group of students as having an “Activity Card” which will allow you to have different price tickets for those students vs. the ones tagged as regular students.
-
Last Period Location – This is for Call Slips and will show up when you print them out so you know where to locate students to pick up for detention.
- Term – This is for reporting, optionally you can just choose “Y” and just load the students one time for the entire year.