Welcome to our Knowledge Base
-
System Settings
-
- System Settings Getting Started (Video)
- Upload Students (Video)
- Upload Students
- Upload Student Pictures
- User Permissions
- SFTP Automated Student Rosters
- Microsoft Single Sign-On (SSO)
- Safari Web Browser
- System Requirements
- Whitelist URL's
- Spirit Point Reward Tracking
- Google Single Sign-On (SSO)
- Status
-
- Upload User Accounts
- User Accounts
- Upload Students
- Upload Students (Video)
- Upload Student Pictures
- User Permissions
- Manage Family and Guests
- Mass Updates
- Manage Students
- Microsoft Single Sign-On (SSO)
- Preparing for Next School Year
- Printer Setup - 3" Thermal (Windows)
- Printer Setup - 3" Thermal (Mac) **Advanced Setup**
- Printer Setup - 3" Thermal Network (Mac) **Advanced Setup**
- Google Single Sign-On (SSO)
- Classlink
- District Admin
- Show all articles (2) Collapse Articles
-
-
Store
-
- Changing Payment Type After Transaction has Completed
- Creating a Transaction
- E-mail Receipts
- Exporting Ticket Sales from Store to Ticketing for Checkin
- Modify Transaction - Post Sale
- Payment Type
- PAX Credit Card Reader Setup
- Portal Purchased Product Pickup and Reports
- Product Buttons
- Printing Receipts
- ProPay: How to Process Credit Cards
- ProPay: How to Void a Transaction
- Scanning a Student ID
- Returns
- Reprint Receipt and Resend Receipt by E-mail
- Student Credit
- Student Credit - Credit Refunds
- Discount Options
- Convenience Fee
- Student Alerts
- Show all articles (5) Collapse Articles
-
- Manage Products
- Barcodes
- Categories
- Configure your Portal and Products
- Inventory
- Mass Product Updates
- Mass Product Update (Video)
- Product History (Link on Current Transaction)
- Product Groups
- Product Agreement
- Store Importing Products
- Vendors
- Account Codes
- Duplicate Product
- Store Imports
- Student Alerts
- Show all articles (1) Collapse Articles
-
- Family and Guest Management
- Manage Spirit Points
- Manage Students
- Manage Family and Guests
- Mass Updates
- Student Credit
- Student Credit - Credit Refunds
- Discount Options
- Student Type
- Managing Student Credit
- Student Spirit Points
- Upload Students
- Upload Student Credit
- Upload Student Pictures
- Upload Students (Video)
- Add Students
- Student Negative Account Balance
- Student Alerts
- Show all articles (3) Collapse Articles
-
- Accessing the Student Only Store Portal
- Accessing the Open Store Portal
- Configure your Portal and Products
- Family and Guest Management
- Google Single Sign-On (SSO)
- Family Portal
- ProPay (Heartland) Merchant Account
- Manage Family and Guests
- Microsoft Single Sign-On (SSO)
- Portal Purchased Product Pickup and Reports
- Convenience Fee
-
- Accessing the Student Only Store Portal
- Accessing the Open Store Portal
- Configure your Portal and Products
- Cash Drawer (Connected to Thermal Printer)
- Cash Drawer (USB) Windows 10
- ProPay (Heartland) Merchant Account
- My Account
- PAX Credit Card Reader Setup
- Portal Purchased Product Pickup and Reports
- Product History (Link on Current Transaction)
- Product Agreement
- SFTP Automated Student Rosters
- School Logo
- Taxes
- User Accounts
- User Permissions
- Upload User Accounts
- Whitelist URL's
- Pay Open Invoice by Credit Card
- Account Codes
- Renewal
- Store Imports
- Show all articles (7) Collapse Articles
-
- System Settings Getting Started (Video)
- Mass Updates
- ProPay (Heartland) Merchant Account
- PAX Credit Card Reader Setup
- Google Single Sign-On (SSO)
- Microsoft Single Sign-On (SSO)
- School Logo
- User Accounts
- Preparing for Next School Year
- Remote Support
- Upload Student Pictures
- User Permissions
- Upload User Accounts
- Convenience Fee
- Classlink
- Account Codes
- Show all articles (1) Collapse Articles
-
Voting
-
- Adding an Election
- Adding Candidates
- Adding Officer Positions
- Adding Pictures and Biographies
- Archive and Retrieve Old Elections
- Create a Survey (Video)
- Election Layout Options
- Duplicate an Election
- Election Preflight
- Preview an Election
- Removing Candidates
- Using Video Biographies
- Write-in Candidates
- Rank Choice Voting
-
- Configure the Student Login Page
- Hobbies and Biography
- My Account
- Notifications for Unsuccessful Student Login Attempts
- Require Student E-mail
- Require Change Passwords
- SFTP Automated Student Rosters
- School Logo
- User Accounts
- User Permissions
- Upload User Accounts
- Whitelist URL's
- Pay Open Invoice by Credit Card
- Renewal
-
Ticketing
-
- System Settings Getting Started (Video)
- Mass Updates
- ProPay (Heartland) Merchant Account
- Microsoft Single Sign-On (SSO)
- Google Single Sign-On (SSO)
- Upload Student Pictures
- User Accounts
- User Permissions
- Upload User Accounts
- School Logo
- Preparing for Next School Year
- Remote Support
- Classlink
- Convenience Fee
-
Interventions
-
- Bell Schedules
- Interventions
- Mass Updates
- My Account
- Printer Setup - 3" Thermal (Windows)
- Printer Setup - 3" Thermal (Mac) **Advanced Setup**
- Printer Setup - 3" Thermal Network (Mac) **Advanced Setup**
- SFTP Automated Student Rosters
- School Logo
- User Accounts
- User Permissions
- Upload User Accounts
- Whitelist URL's
- Pay Open Invoice by Credit Card
- Renewal
-
Announcements
-
Student / Family Portal
-
Digital ID
PAX Credit Card Reader Setup
This is a technical setup that involves editing your computer's host file using Notepad++ ( https://notepad-plus-plus.org/downloads/ ) on a PC and Terminal on a MAC. You can do this only if you have Administrator access to your computer on Windows.
If your district has a firewall you may need to Whitelist the store4schools.com as well as heartlandportico.com
Instructions below are designed for the PAX A35 if using the PAX A920 the screenshots might look slightly different .
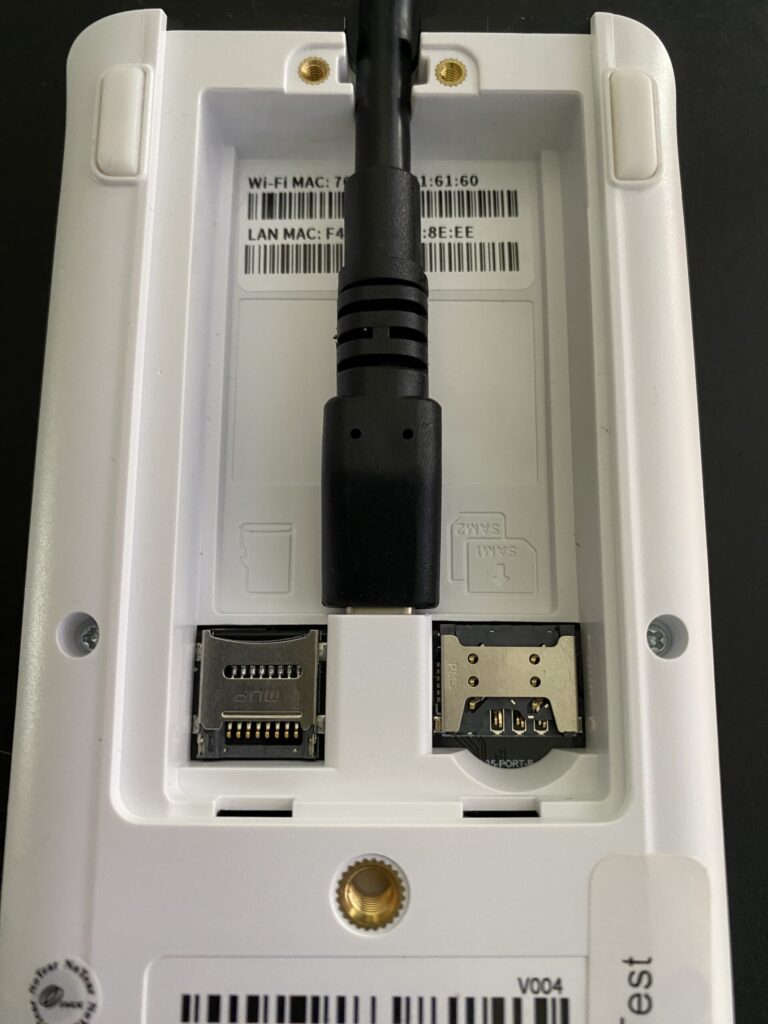
Connecting the Pax Device (A35 Only)
-
Turn your device upside down and plug the USB-C as seen here.
First you will need to plug in your PAX device. There are several cables that need to be plugged in. The USB-C cable will be connected to the under side of your device.
-
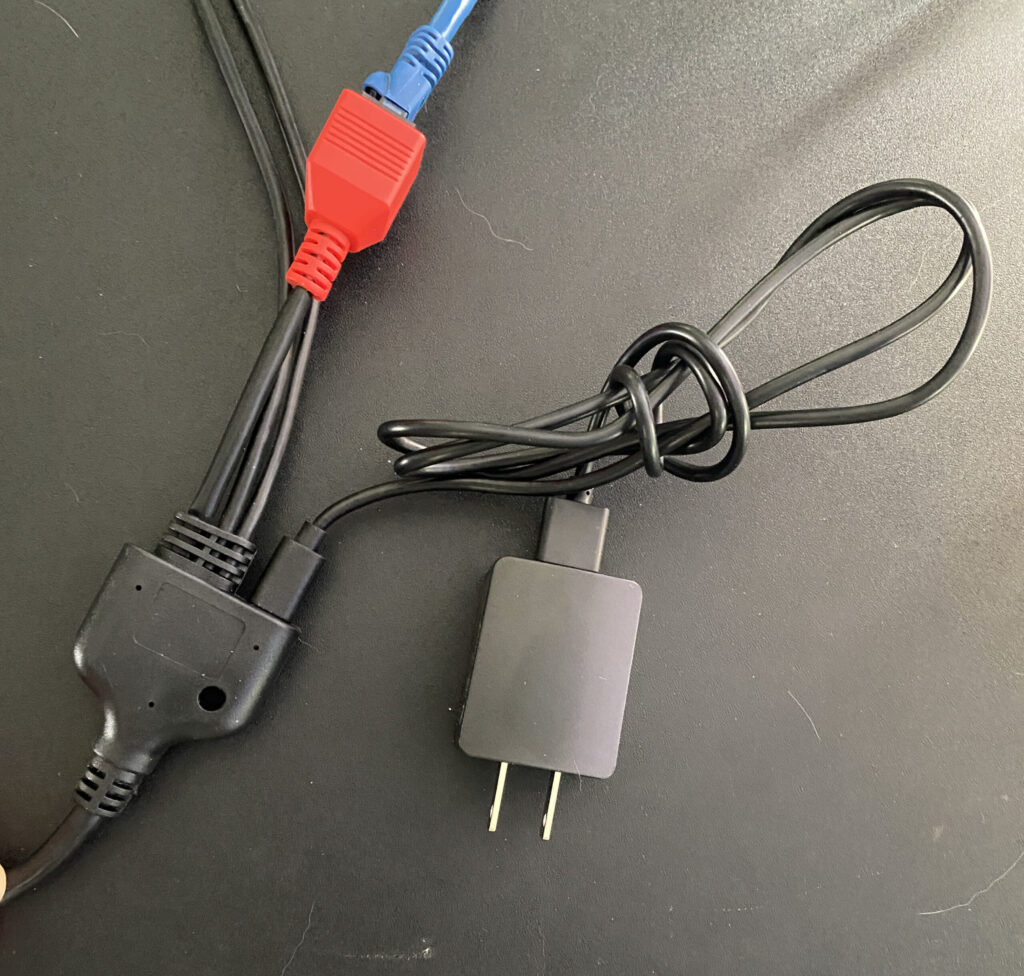
Plug the USB-C cable into the adapter. On the other end is a standard USB plug that will fit into the power adapter and then into the wall outlet.
-
Network / Ethernet cable needs to be plugged into the schools network. The other cables coming out of the Y adapter are not used for our configuration.
The other end of the cable has a Y adapter with 3 cable’s coming out of it and one open spot for a USB-C cable.
Connect to Internet (A35 and A920)

-
Once the device is powered up, click on the Settings icon.
-
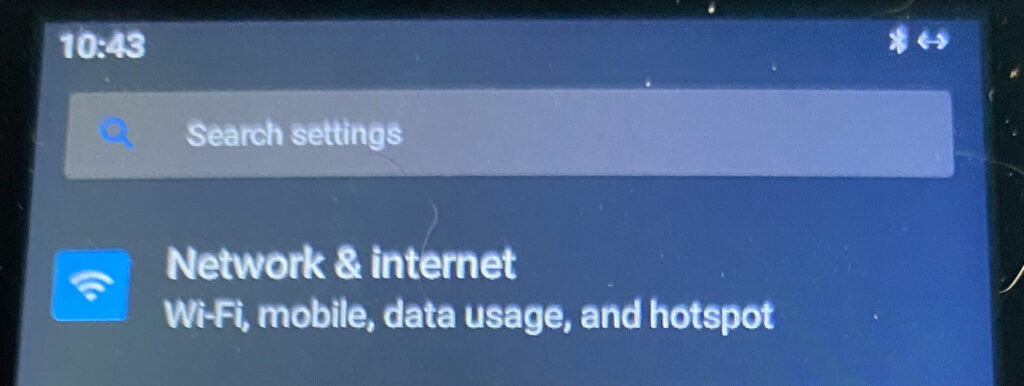
Next click Network & Internet
You will need to choose either wired or wireless connection type. Do not configure both. Make sure that you connect to the same network as your computer is connected to.
A920 - Can only connect via Wi-Fi and the screenshots look slightly different then what is shown below.
Ethernet (Wired - A35 Only)
-
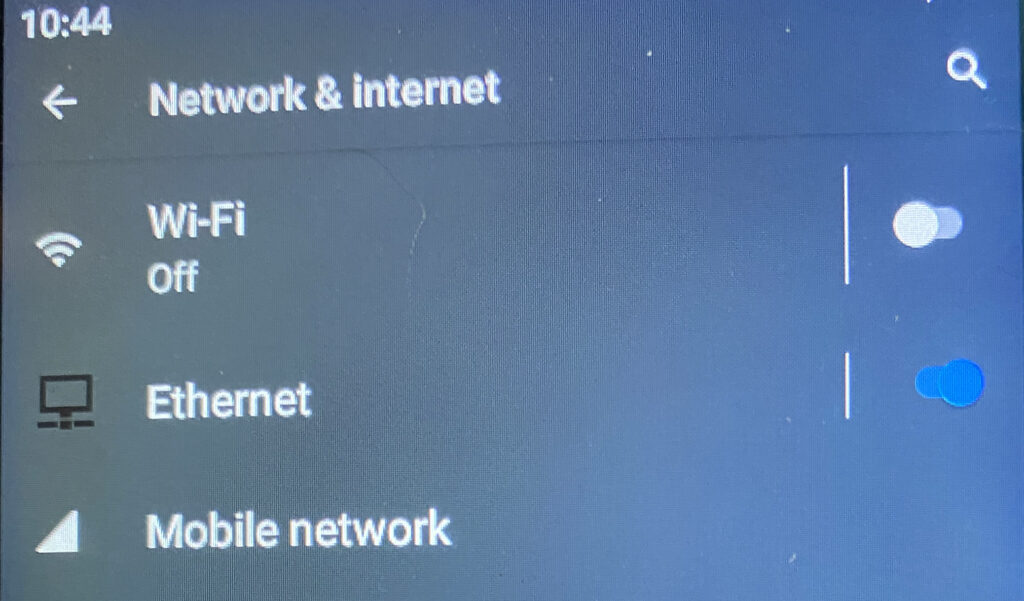
Be sure Ethernet is turned on
-
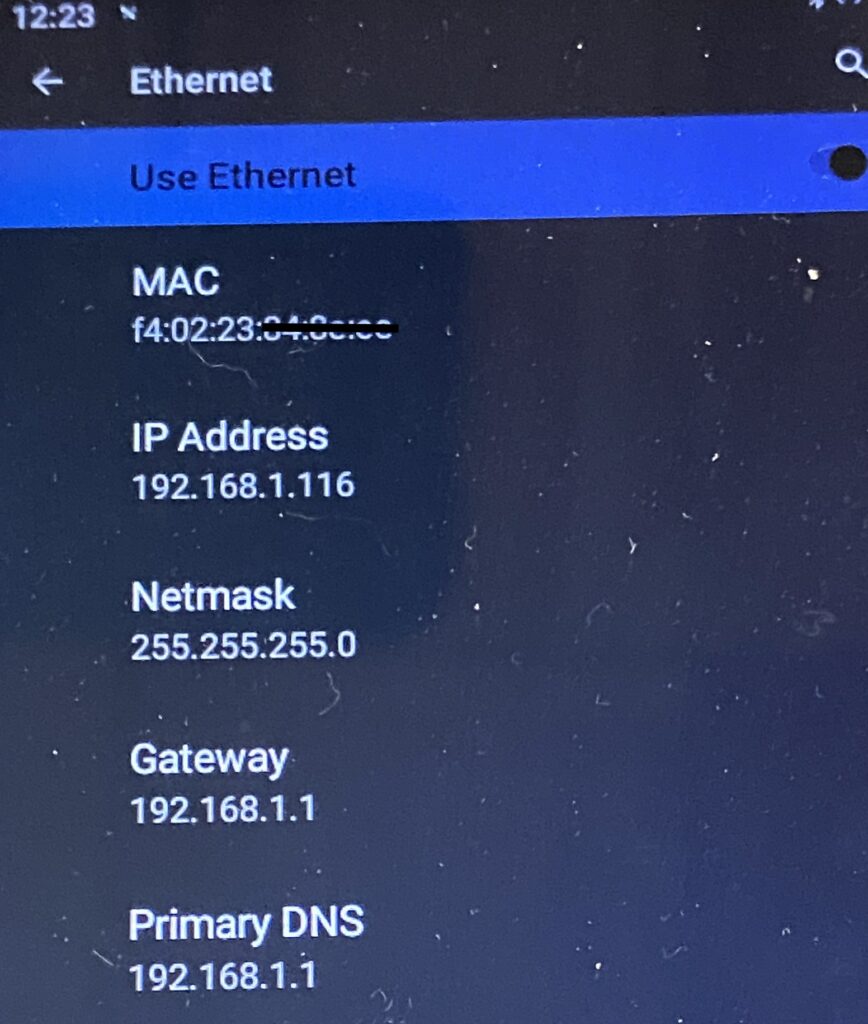
Click the text “Ethernet” to go into the Ethernet settings
If using a wired connection (recommended) turn on Ethernet
-
Identify and write down the IP Address. This will be needed in future steps. In this example (192.168.1.116)
Wi-Fi (Wireless)
-
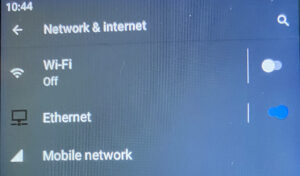
Be sure Wi-Fi is turned on
-
Click the text “Wi-Fi” to go into the settings
If using a wireless connection, turn the switch on for Wi-Fi, this image is white, when it is on it will be Blue.
-
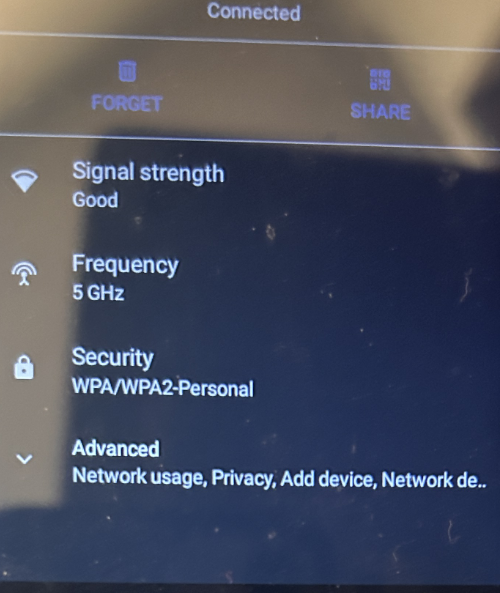
Click the drop down arrow to the left of “Advanced”
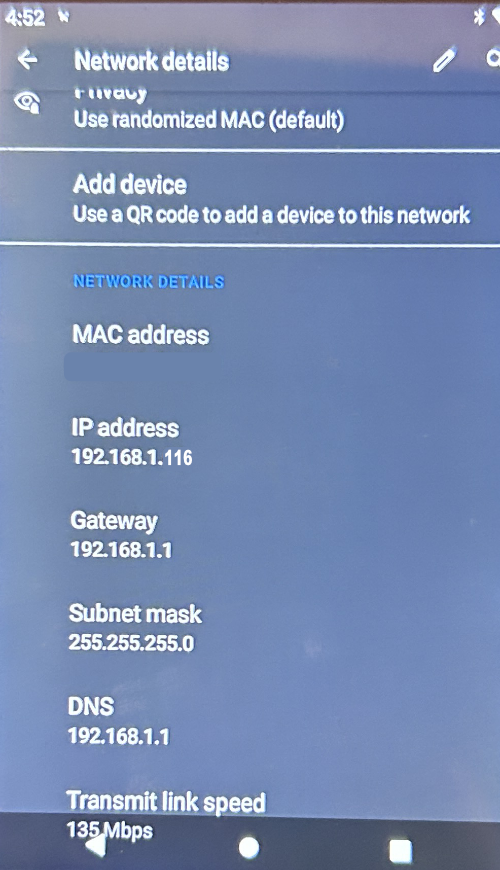
Select your wireless network and connect. Once connected, there will be a small cog wheel next to the network name. Click that and go into the network settings.
-
Identify and write down the IP Address. This will be needed in future steps. Our example is (192.168.1.116)
Windows Setup
Follow the instructions below to continue your setup. You will need to be an Administrator on your computer to complete the following steps.
-
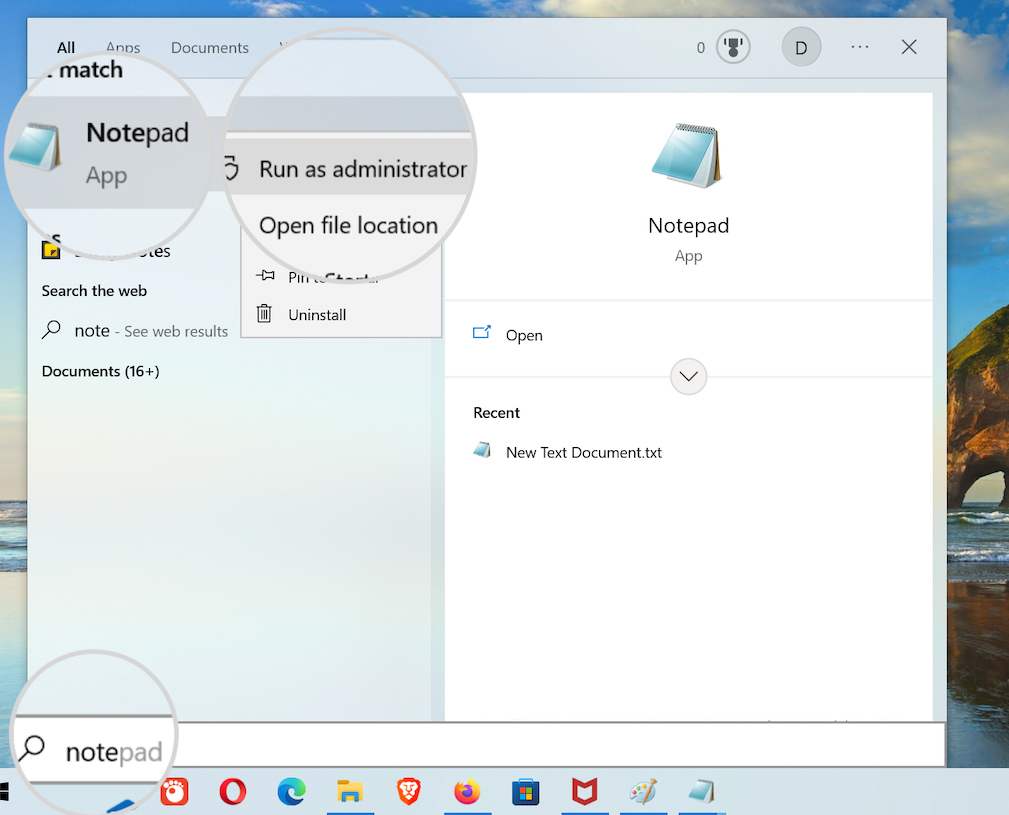
Search for Notepad ( or for Notepad++ ).
-
Right click the Notepad application and choose “Run as administrator“
-
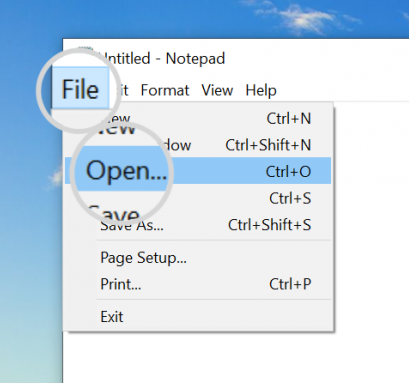
Click File
-
Click Open
-
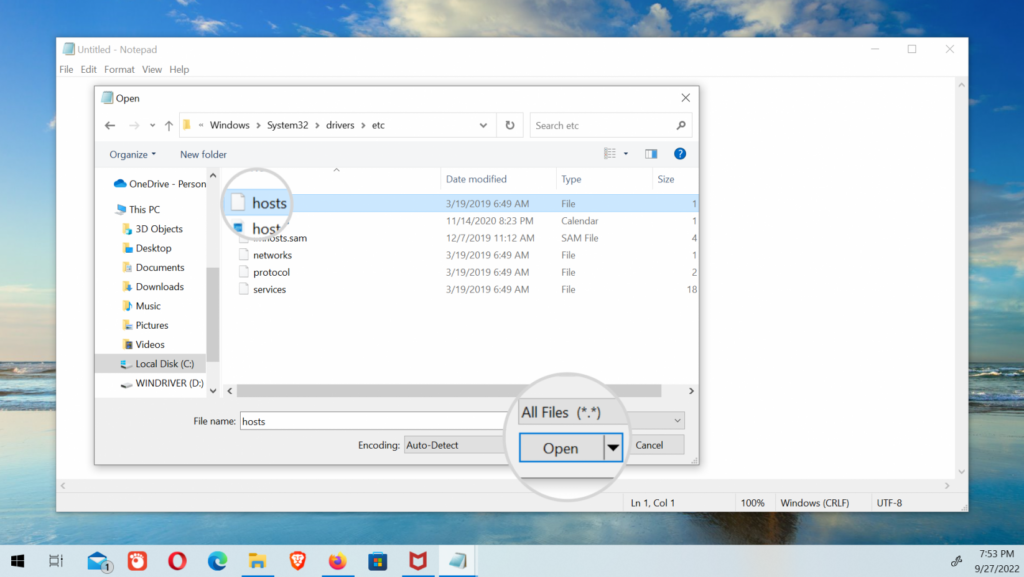
Navigate to C:\Windows\System32\drivers\etc\hosts
-
Change File Types to view to All Files (*.*)
-
Open the “hosts” file
-
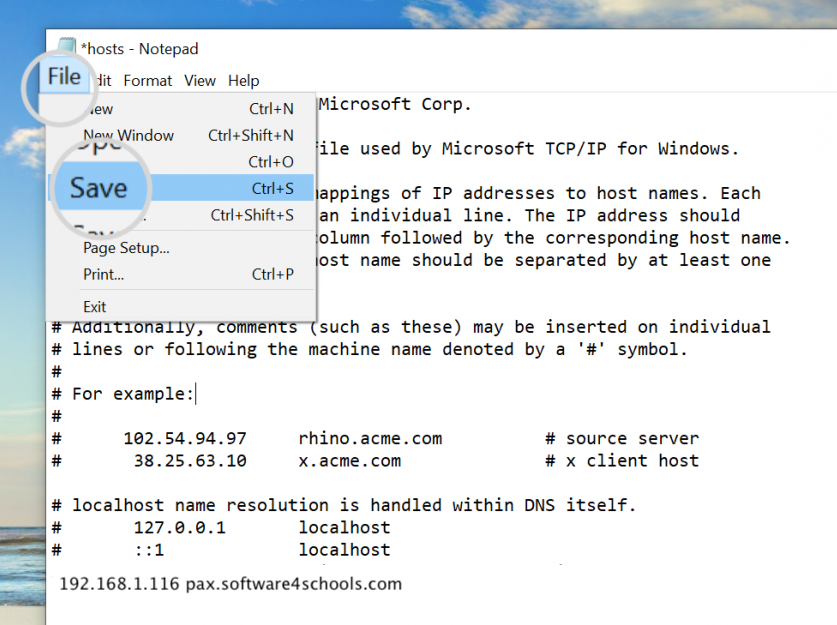
Add in the following line of text
192.168.1.116 pax.software4schools.com
Note: You must change the IP Address to match your device IP Address from above. Also there is no # before the IP address. The # indicates to ignore that line of text
You can only connect 1 PAX credit card reader to one computer at a time. if you have multiple computers and PAX credit card readers then do the same process on the other computers. The only difference will be that the IP address has to match the second device.
For example if you have a second reader and the ip address ends in 117 you would put in a second entry like this.
192.168.1.117 pax.software4schools.com
Apple Setup
Follow the instructions below to continue your setup. You will need to be an Administrator on your computer to complete the following steps.
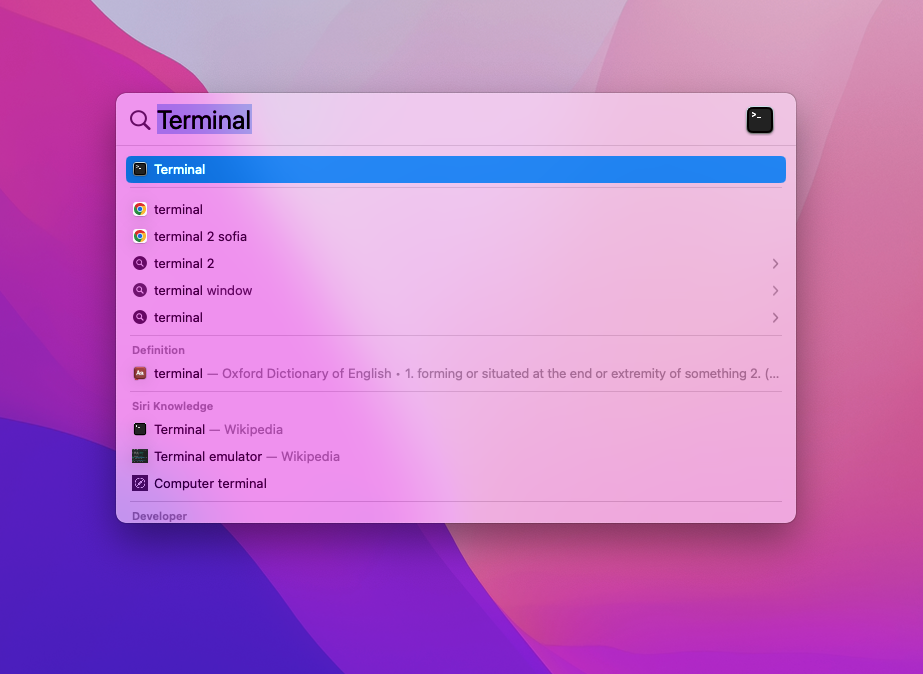
-
Command + Space. In the pop-up window, type Terminal and press Enter.
Or go to Applications / Utilities and Open up Terminal
Open up Terminal
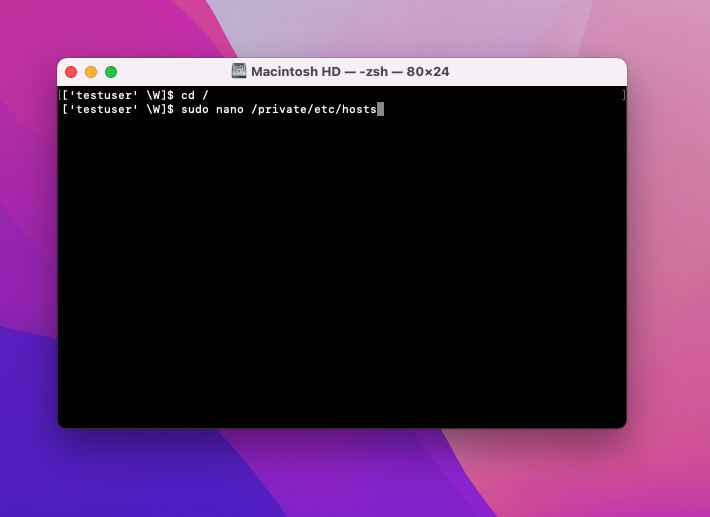
-
Next type the following
sudo nano /etc/hosts
Next click Enter to confirm the command. You will then see the text Password with a key icon. Enter the password for your computer login. This must be an Administrator account
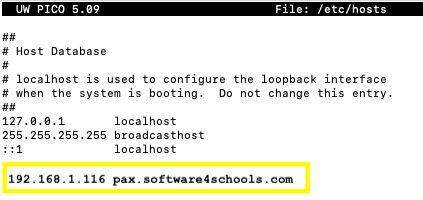
-
Add in the following line of text
192.168.1.116 pax.software4schools.com
Note: You must change the IP Address to match your device IP Address from above.
Finally click control+X then click y Yes to save your file.
You can only connect 1 PAX credit card reader to one computer at a time. if you have multiple computers and PAX credit card readers, do the same process on the other computers. The only difference will be that the IP address has to match the other PAX device.
For example if you have a second reader and the ip address ends in 117 you would put in a second entry like this.
192.168.1.117 pax.software4schools.com
PAX Device (Final Step)
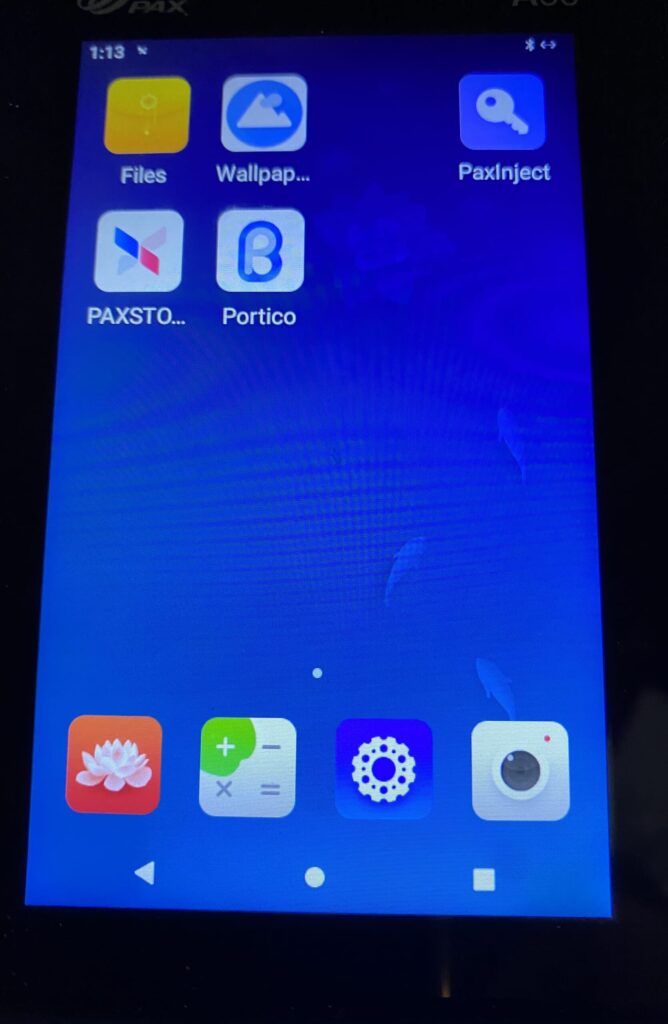
-
Click the Portico app to start it up. This always needs to be running for the software to connect to this device.
Go back into the PAX device. Click the Circle at the bottom of the screen to go back to the home page.

-
When the app is running you will just see the blue screen that says PAX on it. This means your device is ready.
-
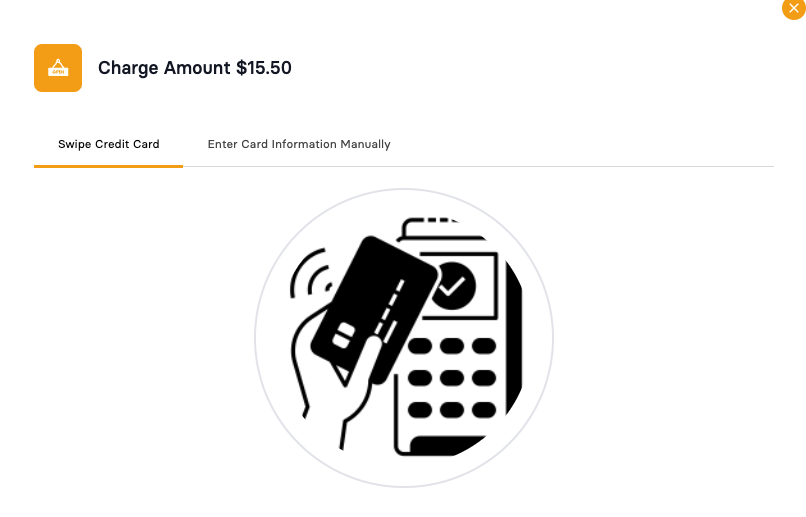
When Credit Card is selected as the payment option you will see this on the Store 4 Schools Screen
-
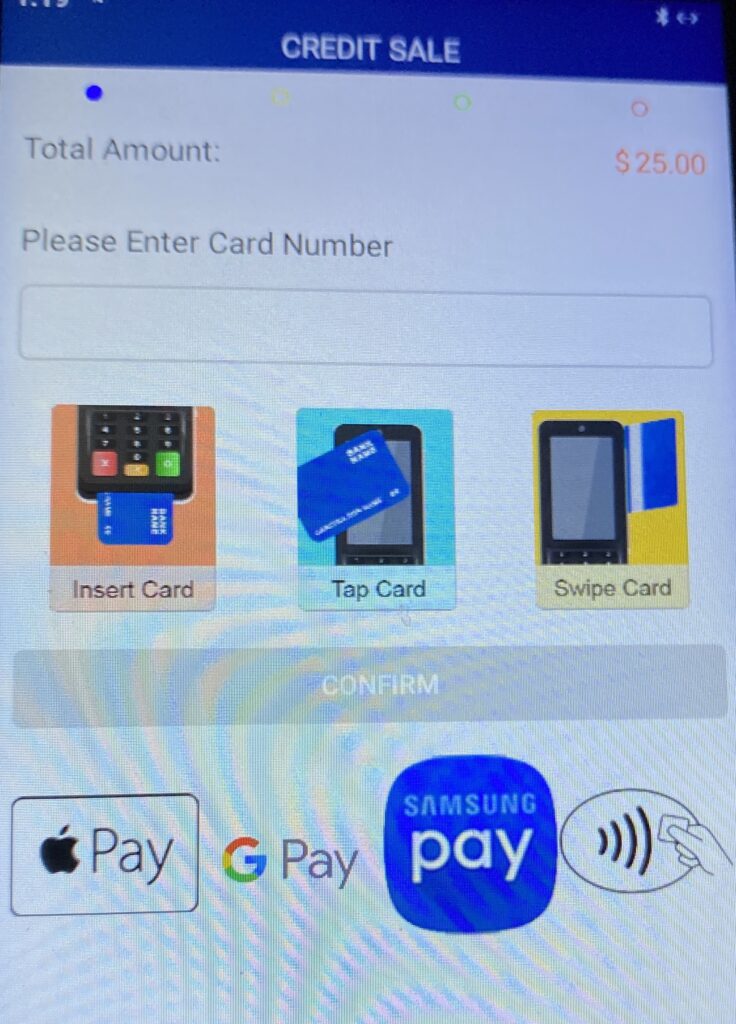
The PAX device should then show a screen like this with the total amount.
1. Open up your local hosts file and make sure your settings were saved.
2. Try and ping your device.
Open up CMD prompt (PC) or Terminal (MAC) and ping the following.
1. Try and ping the IP address of the device, example (ping 192.168.1.117)
2. Try and ping Host URL (ping pax.software4schools.com)
3. Make sure your district firewall is not blocking store4schools.com as well as heartlandportico.com
4. Using Google Chrome, click the 3 dot menu (top right) select More Tools / Developer Tools. Then click on Console and run the credit card process. Send a screenshot to support@software4schools.com
5. Try and disabling any antivirus or computer firewall to see if that is blocking you from accessing the device.