Welcome to our Knowledge Base
-
System Settings
-
- System Settings Getting Started (Video)
- Upload Students (Video)
- Upload Students
- Upload Student Pictures
- User Permissions
- SFTP Automated Student Rosters
- Microsoft Single Sign-On (SSO)
- Safari Web Browser
- System Requirements
- Whitelist URL's
- Spirit Point Reward Tracking
- Google Single Sign-On (SSO)
- Status
- Automated Intervention Extract
-
- Upload User Accounts
- User Accounts
- Upload Students
- Upload Students (Video)
- Upload Student Pictures
- User Permissions
- Manage Family and Guests
- Mass Updates
- Manage Students
- Microsoft Single Sign-On (SSO)
- Preparing for Next School Year
- Printer Setup - 3" Thermal (Windows)
- Printer Setup - 3" Thermal (Mac) **Advanced Setup**
- Printer Setup - 3" Thermal Network (Mac) **Advanced Setup**
- Google Single Sign-On (SSO)
- Classlink
- District Admin
- Show all articles (2) Collapse Articles
-
-
Store
-
- Changing Payment Type After Transaction has Completed
- Creating a Transaction
- E-mail Receipts
- Exporting Ticket Sales from Store to Ticketing for Checkin
- Modify Transaction - Post Sale
- Payment Type
- PAX Credit Card Reader Setup
- Portal Purchased Product Pickup and Reports
- Product Buttons
- Printing Receipts
- ProPay: How to Process Credit Cards
- ProPay: How to Void a Transaction
- Scanning a Student ID
- Returns
- Reprint Receipt and Resend Receipt by E-mail
- Student Credit
- Student Credit - Credit Refunds
- Discount Options
- Convenience Fee
- Student Alerts
- Show all articles (5) Collapse Articles
-
- Manage Products
- Barcodes
- Categories
- Configure your Portal and Products
- Inventory
- Mass Product Updates
- Mass Product Update (Video)
- Product History (Link on Current Transaction)
- Product Groups
- Product Agreement
- Store Importing Products
- Vendors
- Account Codes
- Duplicate Product
- Store Imports
- Student Alerts
- Show all articles (1) Collapse Articles
-
- Family and Guest Management
- Manage Spirit Points
- Manage Students
- Manage Family and Guests
- Mass Updates
- Student Credit
- Student Credit - Credit Refunds
- Discount Options
- Student Type
- Managing Student Credit
- Student Spirit Points
- Upload Students
- Upload Student Credit
- Upload Student Pictures
- Upload Students (Video)
- Add Students
- Student Negative Account Balance
- Student Alerts
- Show all articles (3) Collapse Articles
-
- Accessing the Student Only Store Portal
- Accessing the Open Store Portal
- Configure your Portal and Products
- Family and Guest Management
- Google Single Sign-On (SSO)
- Family Portal
- ProPay (Heartland) Merchant Account
- Manage Family and Guests
- Microsoft Single Sign-On (SSO)
- Portal Purchased Product Pickup and Reports
- Convenience Fee
-
- Accessing the Student Only Store Portal
- Accessing the Open Store Portal
- Configure your Portal and Products
- Cash Drawer (Connected to Thermal Printer)
- Cash Drawer (USB) Windows 10
- ProPay (Heartland) Merchant Account
- My Account
- PAX Credit Card Reader Setup
- Portal Purchased Product Pickup and Reports
- Product History (Link on Current Transaction)
- Product Agreement
- SFTP Automated Student Rosters
- School Logo
- Taxes
- User Accounts
- User Permissions
- Upload User Accounts
- Whitelist URL's
- Pay Open Invoice by Credit Card
- Account Codes
- Renewal
- Store Imports
- Show all articles (7) Collapse Articles
-
- System Settings Getting Started (Video)
- Mass Updates
- ProPay (Heartland) Merchant Account
- PAX Credit Card Reader Setup
- Google Single Sign-On (SSO)
- Microsoft Single Sign-On (SSO)
- School Logo
- User Accounts
- Preparing for Next School Year
- Remote Support
- Upload Student Pictures
- User Permissions
- Upload User Accounts
- Convenience Fee
- Classlink
- Account Codes
- Show all articles (1) Collapse Articles
-
Voting
-
- Adding an Election
- Adding Candidates
- Adding Officer Positions
- Adding Pictures and Biographies
- Archive and Retrieve Old Elections
- Create a Survey (Video)
- Election Layout Options
- Duplicate an Election
- Election Preflight
- Preview an Election
- Removing Candidates
- Using Video Biographies
- Write-in Candidates
- Rank Choice Voting
-
- Configure the Student Login Page
- Hobbies and Biography
- My Account
- Notifications for Unsuccessful Student Login Attempts
- Require Student E-mail
- Require Change Passwords
- SFTP Automated Student Rosters
- School Logo
- User Accounts
- User Permissions
- Upload User Accounts
- Whitelist URL's
- Pay Open Invoice by Credit Card
- Renewal
-
Ticketing
-
- Add Event
- Ticketing Attendance Report
- Check-In
- Display all Events
- Event Types
- Exporting Ticket Sales from Store to Ticketing for Checkin
- Mobile Check-in
- Pre-load Event
- Spirit Point Reward Tracking
- Sell Tickets
- Ticket and Check-in
- Link Store Ticket Sales to Ticketing 4 Schools
- Sell Tickets (New)
- Duplicate Event
-
- System Settings Getting Started (Video)
- Mass Updates
- ProPay (Heartland) Merchant Account
- Microsoft Single Sign-On (SSO)
- Google Single Sign-On (SSO)
- Upload Student Pictures
- User Accounts
- User Permissions
- Upload User Accounts
- School Logo
- Preparing for Next School Year
- Remote Support
- Classlink
- Convenience Fee
-
Interventions
-
- Bell Schedules
- Interventions
- Mass Updates
- My Account
- Printer Setup - 3" Thermal (Windows)
- Printer Setup - 3" Thermal (Mac) **Advanced Setup**
- Printer Setup - 3" Thermal Network (Mac) **Advanced Setup**
- SFTP Automated Student Rosters
- School Logo
- User Accounts
- User Permissions
- Upload User Accounts
- Whitelist URL's
- Pay Open Invoice by Credit Card
- Renewal
- Automated Intervention Extract
- Show all articles (1) Collapse Articles
-
Announcements
-
Student / Family Portal
-
Digital ID
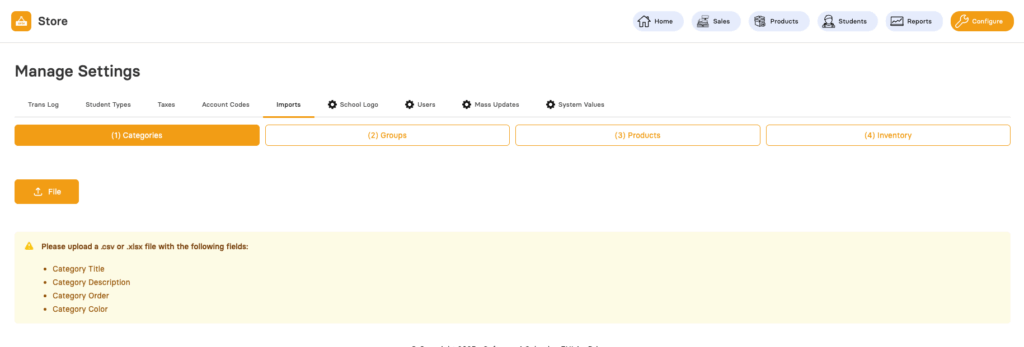
Store Imports
This is a technical document used for new customers that want to import data from another point of sale system. You may be required to manipulate your data files to match our imports. Import file type must be .csv
Imports include: Categories, Groups, Products and Inventory
New customers, we recommend that you import in the order below

-
Configure – Navigate to the configure menu
-
Imports – All imports can be found within the Configure menu under Imports
(1) Categories
-
File – Start by selecting your .CSV file
-
Description – This section displays what columns should be in your file. If you don’t have the data from your current export you might need to manipulate your file. For example if you don’t have a color for your category, you can use #FFFFFF (to make them all white)
For each importer, you will start with uploading a file. There is a description below each file that has a list of what will be included in the upload.
-
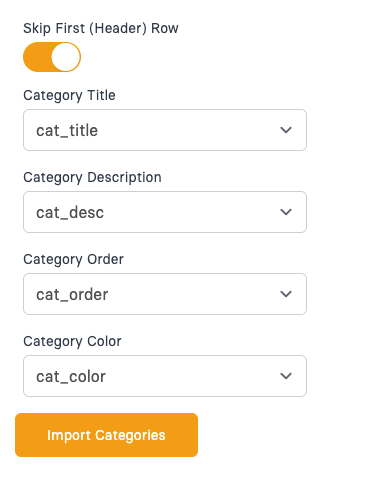
Skip First (Header)Row – The first row of your file should be the header row. If you do not have a header row, you can turn this off and the first row will be part of the import.
-
Match – Once you select your file, align each column to the matching import field and click Import
Import Descriptions
Category Title (varchar 255)
– The title of your categories. Titles can not be any longer than 255 characters and will be displayed on the sales screen. We recommend that you keep them short less than 20 characters.
Category Description (mediumtext)
– Category description is a longer filed that can store a description about the category. This field can be left blank.
Category Order (smallint)
– This is the sort order that categories will be displayed on the sales page. “1” will be the top category then “2” will be displayed afterwards.
Category Color (varchar 20)
– The color of the category is done in hex colors so will be in the format of “#FFFFFF”. Once imported you can always change the color using a color picker in the system.
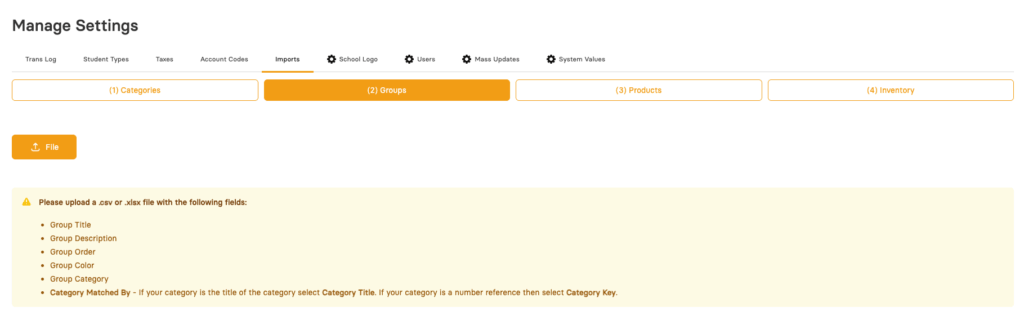
(2) Groups
-
File – Select your file
Import Descriptions
Group Title (varchar 255) *
– This will be the title that will show up on the sales screen for the group of items linked to it.
Group Description (mediumtext)– This is just an internal description for the group.
Group Order (smallint) *
– This will determine the sort order for the group for the product sales page. Lower number has priority over higher numbers.
Group Color (varchar 20) *
– The color of the group button is done in hex colors so will be in the format of “#FFFFFF”. Once imported you can always change the color using a color picker in the system.
Group Category (int) *
-This is a number that will reference the Category Key (link). This will determine what category the group will be an option for.
Category Matched By (Select)
– The easiest way to link the groups back to the category would be to do it by matching the title. If you are loading your Categories and have them in order, you can also link back to that same number order with a number in this filed.
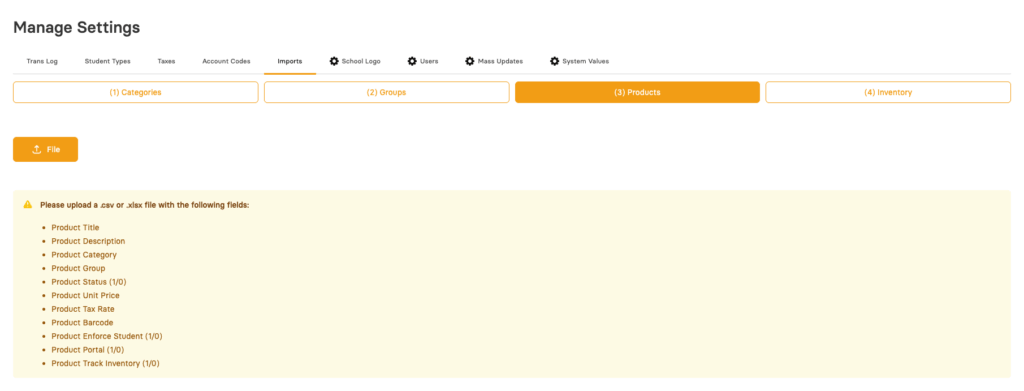
(3) Products
-
File – Select your file
Product Title (varchar 100) * – This is the display name that will show up on the sales page. The field can hold up to 100 characters however we recommend that you keep the names as short as possible (ideally under 15 characters)
Product Description (mediumtext) – This field can be skipped it is just an optional short description about each product.
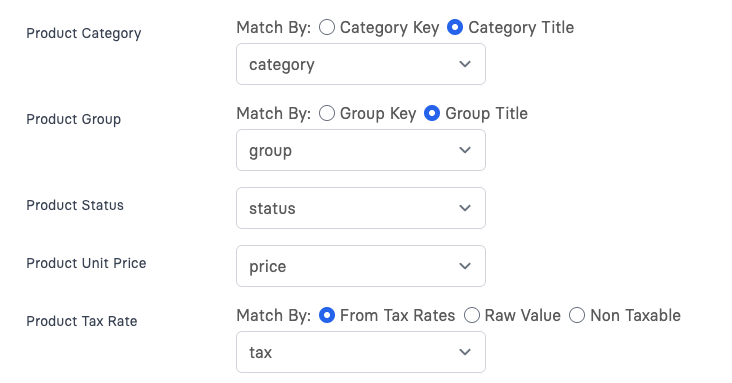
Product Category (int) * – We recommend that you have the exact name of the category here and select “Category Title” as the import option. If you have a number or Key that matches the upload for categories, you can select “Category Key) – see notes above
Product Group (int) – We recommend that you use the exact name of the groups that were uploaded and select “Group Title” if your group names are an exact match. If you file has numbers that match the order of your groups, then select “Group Key”
Product Status (1 / 0) * – Product Status will be either 1 (Active) or 2 (Not Active). We recommend that you only import your Active products.
Product Unit Price (float 10) * – Price of the product. Needs to be in decimal format “2.50” with no dollar sign.
Product Tax Rate (float 10) – If you are charging tax put the tax rate in the column for each product and select Raw Value. If this field is linked to a Key or has a 1 / 0 in the filed, you can add your tax rate first and then the 1 will connect back to the added tax rate and choose the option “From Tax Rate”
Product Barcode (varchar 100) * – This is the barcode for the product. If a product does not have a barcode you need to fill in a unique set of numbers and or letters without spaces.
Product Enforce Student (1 / 0) * – If the item has to be sold to a student (for example a student must be scanned in before selling the item) then put 1. If the item can be sold to anyone then put 0.
Product Portal (1 / 0) – If the product is to be available for sale on the public portal put a 1. If it is not going to be available on the public portal then put a 0.
Product Track Inventory (1 / 0) – If the product will be tracking inventory put a 1. If you are not tracking inventory for the product put a 0.
- Match By (Options)
-
Product Category – You have two options to match with your category. We recommend that you category title for in this column and matches the name exactly. Alternatively, you can also match on the category key which is the order that you provided the upload for categories.
-
Product Group – You have two options to match with your Group. We recommend that you Group title for in this column and matches the name exactly. Alternatively, you can also match on the group key which is the order that you provided the upload for groups.
-
Product Tax – You have 3 options to match with your tax rate. If the product is taxable, you can link back to the Tax Rate Key. To do this, you add the tax rate in our system (under Configure / Taxes). Then you will make all products that are taxable with that rate with the key (which would be 1) if you only have one tax rate entered. Raw Value will look for the exact tax rate so if your file has the actual tax rate for each product then you will choose this option. If all of your items are not taxable then you can choose this third option.
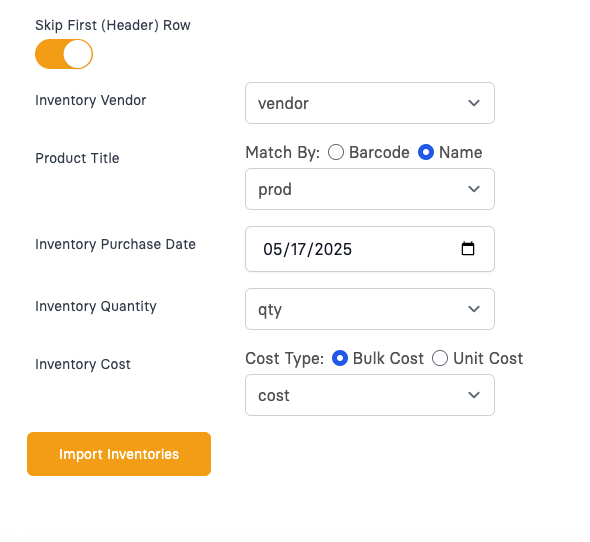
(4) Inventory

-
File – Select your file
-
Match By (Barcode / Name) – When uploading inventory the product title will need to match with either the barcode of the product or the title of the product. If using the title, it will need to be an exact match just like the barcode upload. Be sure all items that are being uploaded into inventory already exist in the product table. If not, those items will not be imported.
-
Cost type (Bulk / Unit) – If your upload file has the total cost for all the inventory purchased (in the upload) then choose Bulk Cost. If your inventory upload has a unit cost, then chose that option.
Import Descriptions
Inventory Vendor (varchar 100) *
– The name of the vendor that it was purchased from.
Product Title (varchar) *
– Match either by the barcode or the title of the product.
Inventory Purchase Date (date) *
– This is the date that the items were purchased. This will not be imported but selected on the import.
Inventory Quantity (int) *
– This is the total number of items that will be in this import file.
Inventory Cost
– Bulk Cost (float 10) *
– This is where you will document the amount for the entire purchase. This is used when calculating profit / loss
– Unit Cost (float 10) *
-This is the unit cost. The unit cost times the inv_quantity should match the inv_bluk_cost. For example if you have 5 widgets and paid $20.00 for them your unit cost would be 4.00