Welcome to our Knowledge Base
-
System Settings
-
- System Settings Getting Started (Video)
- Upload Students (Video)
- Upload Students
- Upload Student Pictures
- User Permissions
- SFTP Automated Student Rosters
- Microsoft Single Sign-On (SSO)
- Safari Web Browser
- System Requirements
- Whitelist URL's
- Spirit Point Reward Tracking
- Google Single Sign-On (SSO)
- Status
- Automated Intervention Extract
-
- Upload User Accounts
- User Accounts
- Upload Students
- Upload Students (Video)
- Upload Student Pictures
- User Permissions
- Manage Family and Guests
- Mass Updates
- Manage Students
- Microsoft Single Sign-On (SSO)
- Preparing for Next School Year
- Printer Setup - 3" Thermal (Windows)
- Printer Setup - 3" Thermal (Mac) **Advanced Setup**
- Printer Setup - 3" Thermal Network (Mac) **Advanced Setup**
- Google Single Sign-On (SSO)
- Classlink
- District Admin
- Show all articles (2) Collapse Articles
-
-
Store
-
- Changing Payment Type After Transaction has Completed
- Creating a Transaction
- E-mail Receipts
- Exporting Ticket Sales from Store to Ticketing for Checkin
- Modify Transaction - Post Sale
- Payment Type
- PAX Credit Card Reader Setup
- Portal Purchased Product Pickup and Reports
- Product Buttons
- Printing Receipts
- ProPay: How to Process Credit Cards
- ProPay: How to Void a Transaction
- Scanning a Student ID
- Returns
- Reprint Receipt and Resend Receipt by E-mail
- Student Credit
- Student Credit - Credit Refunds
- Discount Options
- Convenience Fee
- Student Alerts
- Show all articles (5) Collapse Articles
-
- Manage Products
- Barcodes
- Categories
- Configure your Portal and Products
- Inventory
- Mass Product Updates
- Mass Product Update (Video)
- Product History (Link on Current Transaction)
- Product Groups
- Product Agreement
- Store Importing Products
- Vendors
- Account Codes
- Duplicate Product
- Store Imports
- Student Alerts
- Show all articles (1) Collapse Articles
-
- Family and Guest Management
- Manage Spirit Points
- Manage Students
- Manage Family and Guests
- Mass Updates
- Student Credit
- Student Credit - Credit Refunds
- Discount Options
- Student Type
- Managing Student Credit
- Student Spirit Points
- Upload Students
- Upload Student Credit
- Upload Student Pictures
- Upload Students (Video)
- Add Students
- Student Negative Account Balance
- Student Alerts
- Show all articles (3) Collapse Articles
-
- Accessing the Student Only Store Portal
- Accessing the Open Store Portal
- Configure your Portal and Products
- Family and Guest Management
- Google Single Sign-On (SSO)
- Family Portal
- ProPay (Heartland) Merchant Account
- Manage Family and Guests
- Microsoft Single Sign-On (SSO)
- Portal Purchased Product Pickup and Reports
- Convenience Fee
-
- Accessing the Student Only Store Portal
- Accessing the Open Store Portal
- Configure your Portal and Products
- Cash Drawer (Connected to Thermal Printer)
- Cash Drawer (USB) Windows 10
- ProPay (Heartland) Merchant Account
- My Account
- PAX Credit Card Reader Setup
- Portal Purchased Product Pickup and Reports
- Product History (Link on Current Transaction)
- Product Agreement
- SFTP Automated Student Rosters
- School Logo
- Taxes
- User Accounts
- User Permissions
- Upload User Accounts
- Whitelist URL's
- Pay Open Invoice by Credit Card
- Account Codes
- Renewal
- Store Imports
- Show all articles (7) Collapse Articles
-
- System Settings Getting Started (Video)
- Mass Updates
- ProPay (Heartland) Merchant Account
- PAX Credit Card Reader Setup
- Google Single Sign-On (SSO)
- Microsoft Single Sign-On (SSO)
- School Logo
- User Accounts
- Preparing for Next School Year
- Remote Support
- Upload Student Pictures
- User Permissions
- Upload User Accounts
- Convenience Fee
- Classlink
- Account Codes
- Show all articles (1) Collapse Articles
-
Voting
-
- Adding an Election
- Adding Candidates
- Adding Officer Positions
- Adding Pictures and Biographies
- Archive and Retrieve Old Elections
- Create a Survey (Video)
- Election Layout Options
- Duplicate an Election
- Election Preflight
- Preview an Election
- Removing Candidates
- Using Video Biographies
- Write-in Candidates
- Rank Choice Voting
-
- Configure the Student Login Page
- Hobbies and Biography
- My Account
- Notifications for Unsuccessful Student Login Attempts
- Require Student E-mail
- Require Change Passwords
- SFTP Automated Student Rosters
- School Logo
- User Accounts
- User Permissions
- Upload User Accounts
- Whitelist URL's
- Pay Open Invoice by Credit Card
- Renewal
-
Ticketing
-
- Add Event
- Ticketing Attendance Report
- Check-In
- Display all Events
- Event Types
- Exporting Ticket Sales from Store to Ticketing for Checkin
- Mobile Check-in
- Pre-load Event
- Spirit Point Reward Tracking
- Sell Tickets
- Ticket and Check-in
- Link Store Ticket Sales to Ticketing 4 Schools
- Sell Tickets (New)
- Duplicate Event
-
- System Settings Getting Started (Video)
- Mass Updates
- ProPay (Heartland) Merchant Account
- Microsoft Single Sign-On (SSO)
- Google Single Sign-On (SSO)
- Upload Student Pictures
- User Accounts
- User Permissions
- Upload User Accounts
- School Logo
- Preparing for Next School Year
- Remote Support
- Classlink
- Convenience Fee
-
Interventions
-
- Bell Schedules
- Interventions
- Mass Updates
- My Account
- Printer Setup - 3" Thermal (Windows)
- Printer Setup - 3" Thermal (Mac) **Advanced Setup**
- Printer Setup - 3" Thermal Network (Mac) **Advanced Setup**
- SFTP Automated Student Rosters
- School Logo
- User Accounts
- User Permissions
- Upload User Accounts
- Whitelist URL's
- Pay Open Invoice by Credit Card
- Renewal
- Automated Intervention Extract
- Show all articles (1) Collapse Articles
-
Announcements
-
Student / Family Portal
-
Digital ID
Creating a Transaction
In this article, you will learn about creating a transaction.

-
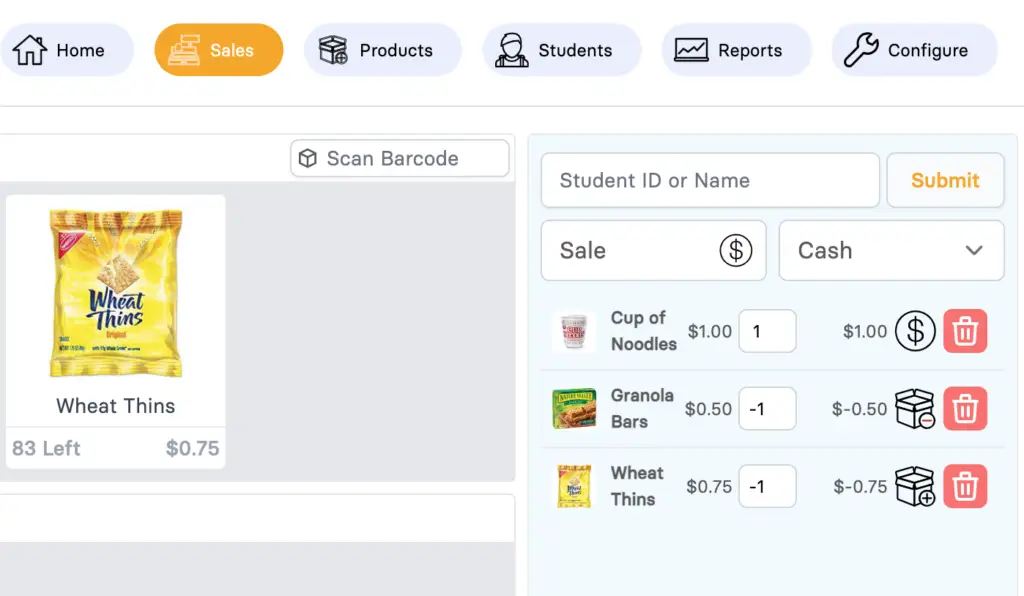
By default when you load the page, the curser will be in the Scan Barcode box, so if using a scanner you can scan your barcode right away. Once scanned, click on the Submit button.
-
Click on the product(s) required to add to the transaction.
-
You can scan a student ID or search for Student Name to associate the transaction to that particular student.
To access, click on the Sales button available at the top bar. On this page, you can view all products available in your Store.
Current Transaction

-
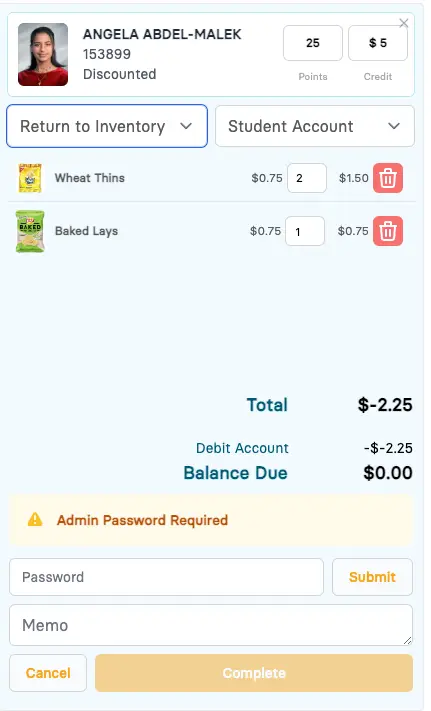
Transaction type by default will be set to Sale. However, you can change it to return if necessary.
-
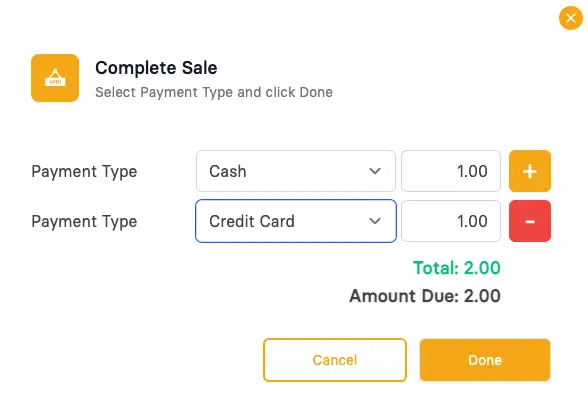
Change the payment type from Cash, Check, Credit Card or Student Account
-
Clicking on the $ will cycle through options to return the product to inventory (+) and return the product with no Inventory (-)
-
Clicking on the Trash icon will remove the item from your cart.
Read below to learn about the current transaction section.

