Welcome to our Knowledge Base
Family Portal

-
Click Create Account or Sign In if you already have an account.
If the store is set to public you will be able to see all of the items that can be purchased by anyone. Items that are locked to only be sold only to a student will not be seen until you login. to a student can not be seen until you login.

-
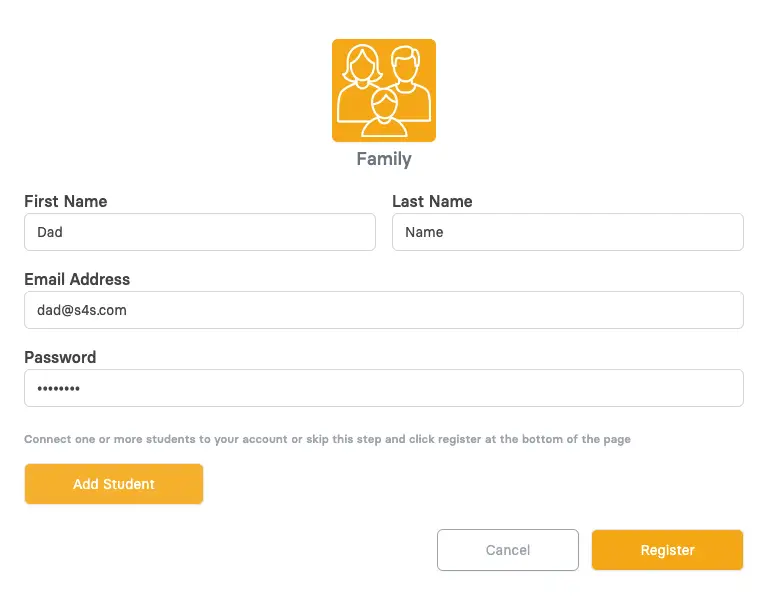
Click the Family icon to start the process.
There are thee types of accounts. A student can create their own account, Family members create an account that allows them to connect to all of their students and guests can create an account that will not have access to purchase history or to add credit to a student account.
-
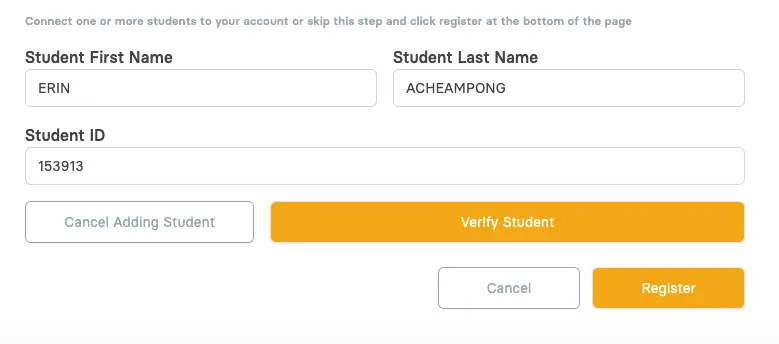
Click the Add Student button to connect your account to one or more students.
Add your name, email address and create a password.
-
Click Verify to confirm your student data.
To link to a student account enter the students first name, last name and student ID number which are all required for a family account.
-
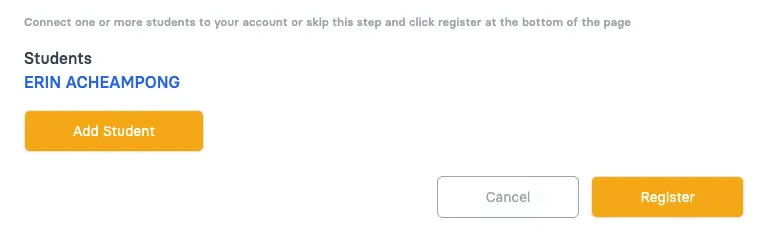
If the student name and ID are a match, you will see their name in blue
-
You can add additional students at this time.
-
When you are done adding students you can click Register to complete this process.

-
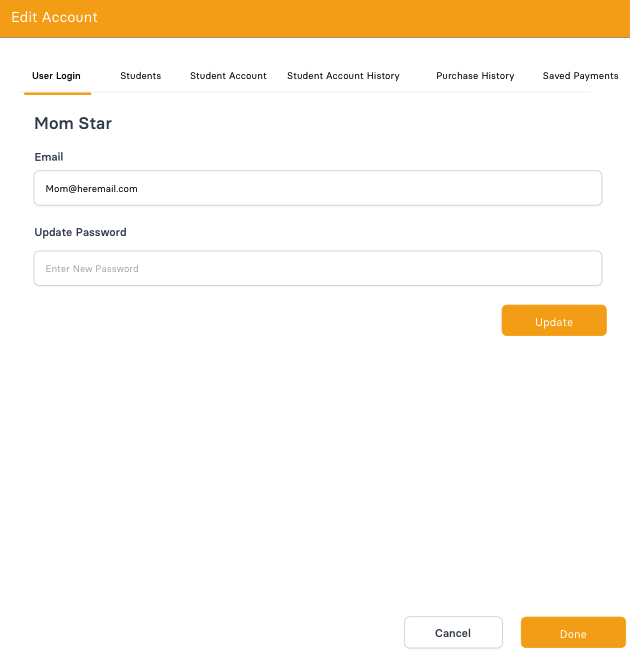
When logged in, you can click the Cog Wheel in the bottom left to update your account.
-
User Login: Here you can update your email or password
-
Students: To add or remove connected students. =
-
Student Account: To update the student credit and alerts on student accounts.
-
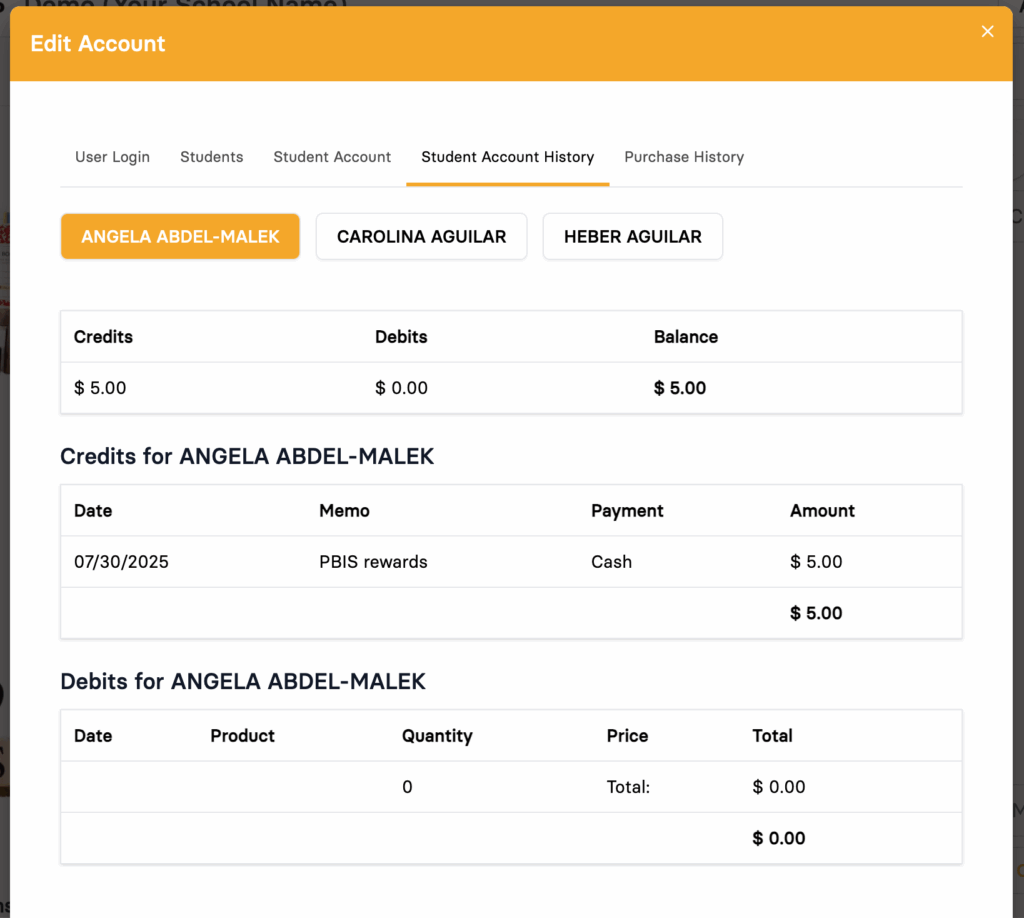
Student Account History: View all student account purchases and money added to the student account.
-
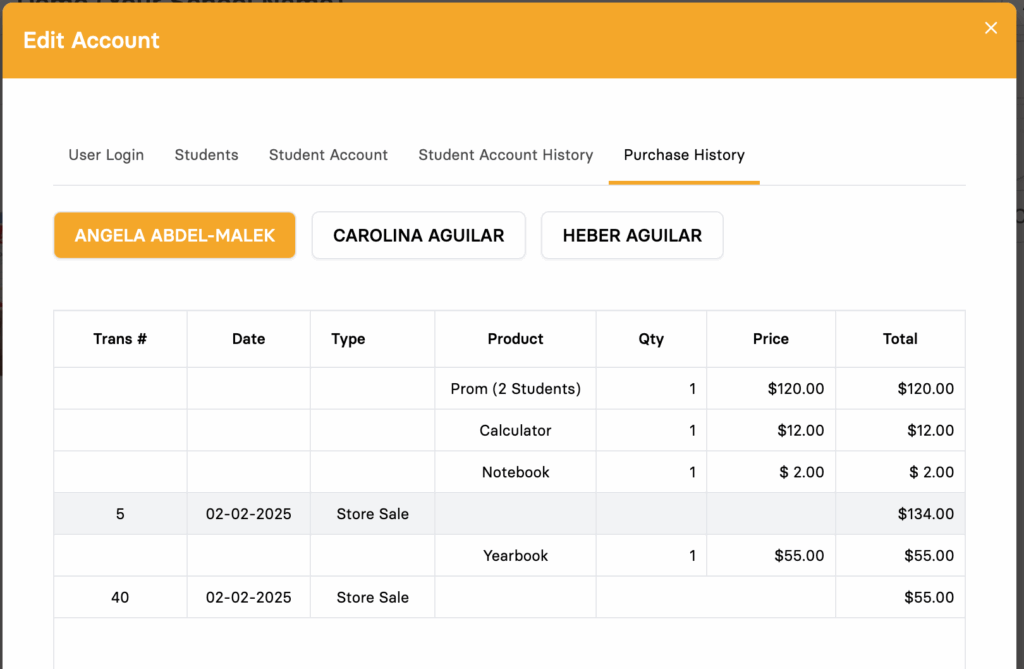
Purchase History: View all transaction made by each student.
-
Saved Payments: Securely store your credit card details to reuse in the future and is used for auto replenish.
-
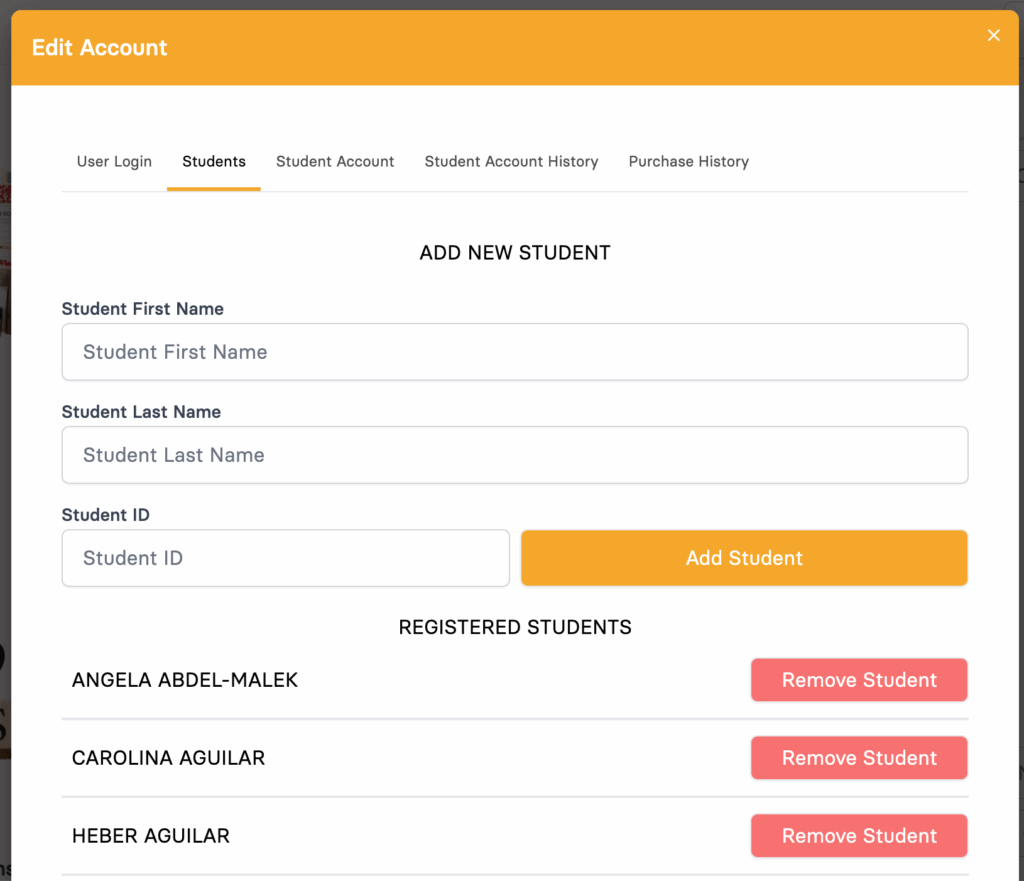
Add Student – To add a new student to your account, enter the first, last and student ID number. This has to be an exact match to what the school has on file. Click Add Student and they will show up on the list below.
-
Registered Students – This list is all the students connected to your account. You can use the Remove Student but to disconnect any students from your account.
-
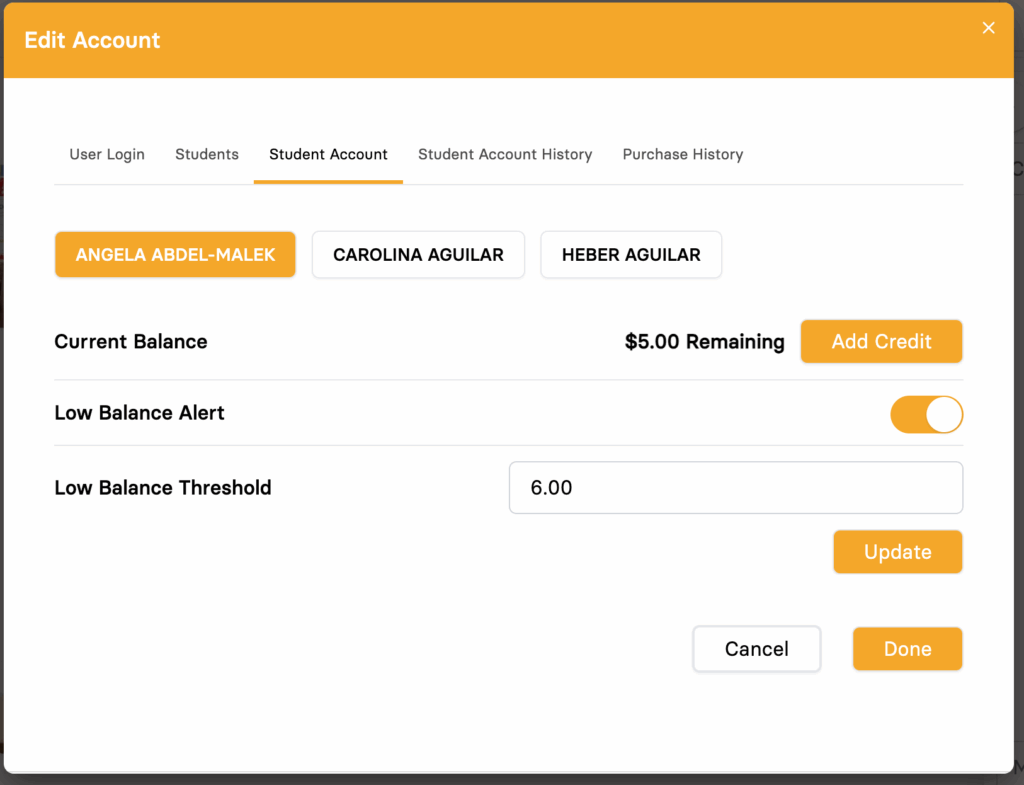
Select Student – Each student can have his or her own settings. Click on each student to see the current balance as well as update the settings below. .
-
Credit – This is the current amount of credit on the selected student account. To manually add credit, click the add credit button.

-
Low Balance Alert – This feature is designed to automatically send email notification when student account drops below this amount. Turn the switch to on (orange) to get notifications.
-
Low Balance – When this setting is turned you will see an option to enter the threshold amount that will trigger an Email notification. When a students account crosses that threshold amount an email will be sent. No additional emails are sent for further purchases after the threshold is crossed.
Example:
A student has $35 and spends $10, dropping the balance to $25, which is below the $30 Threshold.
→ A low-balance email is sent.If the student then spends another $2 before the account is replenished,
→ No additional email is sent.Once the balance is replenished and goes above the Threshold again, the next time it drops below it,
→ A new low-balance email will be triggered.
-
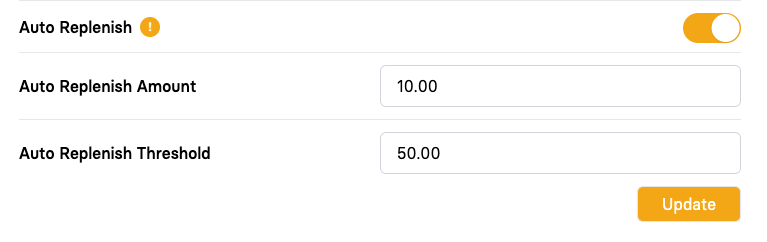
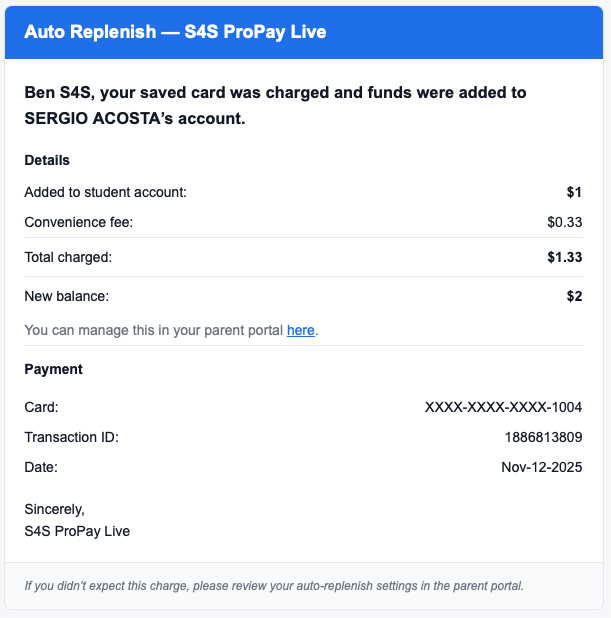
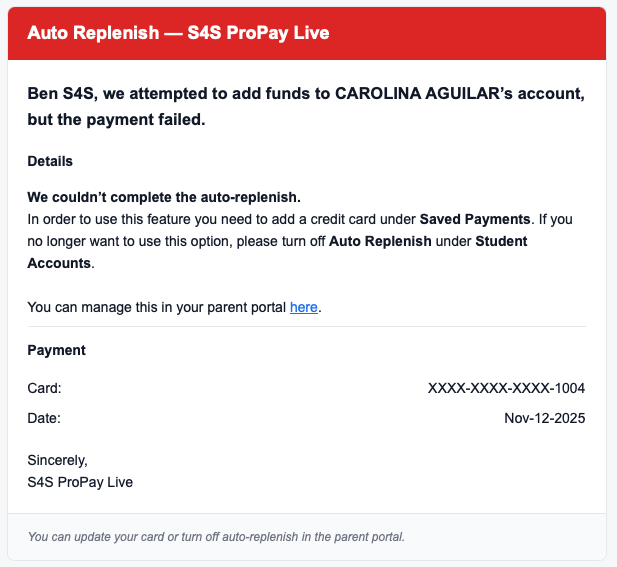
Auto Replenish – This feature is designed to automatically add credit to a student account once it drops below a set threshold. Turn the switch to on (orange) to see the Amount and Threshold settings.
-
Auto Replenish Amount – This is the amount of money that will be charged to your saved credit card and added to the selected student account.
Example:
Balance drops to $35 with a Threshold of $50 and a Replenish Amount of $10.
Since $10 isn’t enough to reach $50, the system adds $15 to reach the Threshold, then adds the $10 replenish.
Total added: $25 → New balance: $60 -
Auto Replenish Threshold – This is the trigger that the system looks at to see if more money is need for the student account.
-
Select Student – Select the student to view their account history.
-
Credit – Total amount that has been added to the student account. Debits – Total amount that has been removed or spent from the student account. Balance – Current amount left on the student account.
-
Credits and Debits – This is the details for the Credits and Debits on that account.
-
Select Student – Select the student to view their account history.
-
Table – View all transaction details for each student.
-
Saved Credit Card – Add a credit card to securely store on file. This credit card can be set to automatically replenish student account when it drops below a specified amount.

-
Click the student name to change between students if you have access to multiple students.
-
If your school has spirit points turned on you will see the total points your child has in their account. If your school has student accounts turned on you will see either the balance or the Add Credit button. Clicking that will allow you to use your credit card to add money on to your student account.
-
When you add items to the cart, you can increase the quantity or remove the item from your cart by clicking on the trash can.
-
If you need to add a note before completing your transaction this is where that can be entered.