

Welcome to our Knowledge Base
-
System Settings
-
- System Settings Getting Started (Video)
- Upload Students (NEW)
- Upload Students (Video)
- Upload Students
- Upload Student Pictures
- User Permissions
- SFTP Automated Student Rosters
- Microsoft Single Sign-On (SSO)
- Safari Web Browser
- System Requirements
- Whitelist URL's
- Spirit Point Reward Tracking
- Google Single Sign-On (SSO)
- Status
- Automated Intervention Extract
- Release Notes
- Show all articles (1) Collapse Articles
-
- Upload User Accounts
- User Accounts
- Upload Students
- Upload Students (Video)
- Upload Student Pictures
- User Permissions
- Manage Family and Guests
- Mass Updates
- Manage Students
- Microsoft Single Sign-On (SSO)
- Preparing for Next School Year
- Printer Setup - 3" Thermal (Windows)
- Printer Setup - 3" Thermal (Mac) **Advanced Setup**
- Printer Setup - 3" Thermal Network (Mac) **Advanced Setup**
- Google Single Sign-On (SSO)
- Classlink
- District Admin
- Upload Students (NEW)
- Show all articles (3) Collapse Articles
-
-
Store
-
- Changing Payment Type After Transaction has Completed
- Creating a Transaction
- E-mail Receipts
- Exporting Ticket Sales from Store to Ticketing for Checkin
- Modify Transaction - Post Sale
- Payment Type
- PAX Credit Card Reader Setup
- Portal Purchased Product Pickup and Reports
- Product Buttons
- Printing Receipts
- ProPay: How to Process Credit Cards
- ProPay: How to Void a Transaction
- Scanning a Student ID
- Returns
- Reprint Receipt and Resend Receipt by E-mail
- Student Credit
- Student Credit - Credit Refunds
- Discount Options
- Convenience Fee
- Student Alerts
- Show all articles (5) Collapse Articles
-
- Family and Guest Management
- Manage Spirit Points
- Manage Students
- Manage Family and Guests
- Mass Updates
- Student Credit
- Student Credit - Credit Refunds
- Discount Options
- Student Type
- Managing Student Credit
- Student Spirit Points
- Upload Students
- Upload Student Credit
- Upload Student Pictures
- Upload Students (Video)
- Add Students
- Student Negative Account Balance
- Student Alerts
- Upload Students (NEW)
- Student Invoices: monthly student account statements
- Show all articles (5) Collapse Articles
-
- Accessing the Student Only Store Portal
- Accessing the Open Store Portal
- Configure your Portal and Products
- Family and Guest Management
- Google Single Sign-On (SSO)
- Family Portal
- ProPay (Heartland) Merchant Account
- Manage Family and Guests
- Microsoft Single Sign-On (SSO)
- Portal Purchased Product Pickup and Reports
- Convenience Fee
-
- Accessing the Student Only Store Portal
- Accessing the Open Store Portal
- Configure your Portal and Products
- Cash Drawer (Connected to Thermal Printer)
- Cash Drawer (USB) Windows 10
- ProPay (Heartland) Merchant Account
- My Account
- PAX Credit Card Reader Setup
- Portal Purchased Product Pickup and Reports
- Product History (Link on Current Transaction)
- Product Agreement
- SFTP Automated Student Rosters
- School Logo
- Taxes
- User Accounts
- User Permissions
- Upload User Accounts
- Whitelist URL's
- Pay Open Invoice by Credit Card
- Account Codes
- Renewal
- Store Imports
- Show all articles (7) Collapse Articles
-
- System Settings Getting Started (Video)
- Mass Updates
- ProPay (Heartland) Merchant Account
- PAX Credit Card Reader Setup
- Google Single Sign-On (SSO)
- Microsoft Single Sign-On (SSO)
- School Logo
- User Accounts
- Preparing for Next School Year
- Remote Support
- Upload Student Pictures
- User Permissions
- Upload User Accounts
- Convenience Fee
- Classlink
- Account Codes
- Show all articles (1) Collapse Articles
-
Voting
-
- Adding an Election
- Adding Candidates
- Adding Officer Positions
- Adding Pictures and Biographies
- Archive and Retrieve Old Elections
- Create a Survey (Video)
- Election Layout Options
- Duplicate an Election
- Election Preflight
- Preview an Election
- Removing Candidates
- Using Video Biographies
- Write-in Candidates
- Rank Choice Voting
-
- Configure the Student Login Page
- Hobbies and Biography
- My Account
- Notifications for Unsuccessful Student Login Attempts
- Require Student E-mail
- Require Change Passwords
- SFTP Automated Student Rosters
- School Logo
- User Accounts
- User Permissions
- Upload User Accounts
- Whitelist URL's
- Pay Open Invoice by Credit Card
- Renewal
-
Ticketing
-
- Add Event
- Ticketing Attendance Report
- Check-In
- Display all Events
- Event Types
- Exporting Ticket Sales from Store to Ticketing for Checkin
- Mobile Check-in
- Pre-load Event
- Spirit Point Reward Tracking
- Sell Tickets
- Ticket and Check-in
- Link Store Ticket Sales to Ticketing 4 Schools
- Sell Tickets (New)
- Duplicate Event
-
- System Settings Getting Started (Video)
- Mass Updates
- ProPay (Heartland) Merchant Account
- Microsoft Single Sign-On (SSO)
- Google Single Sign-On (SSO)
- Upload Student Pictures
- User Accounts
- User Permissions
- Upload User Accounts
- School Logo
- Preparing for Next School Year
- Remote Support
- Classlink
- Convenience Fee
-
Interventions
-
- Bell Schedules
- Interventions
- Mass Updates
- My Account
- Printer Setup - 3" Thermal (Windows)
- Printer Setup - 3" Thermal (Mac) **Advanced Setup**
- Printer Setup - 3" Thermal Network (Mac) **Advanced Setup**
- SFTP Automated Student Rosters
- School Logo
- User Accounts
- User Permissions
- Upload User Accounts
- Whitelist URL's
- Pay Open Invoice by Credit Card
- Renewal
- Automated Intervention Extract
- Show all articles (1) Collapse Articles
-
Announcements
-
Student / Family Portal
-
Digital ID
Student Invoices: monthly student account statements
Student Invoices makes a statement for each student you pick: one page per student, all in one PDF. Use it to bill families for what their student bought in the school store, to see everything that happened on an account in a month, or to print statements for the families who owe money. The students shown in the pictures below are made up.
Two ways schools use student accounts
The statement works for both.
- Prepaid: families add money first, and the student spends it down. The balance stays at zero or above.
- Bill afterwards: the student is allowed to go below zero (the school sets the limit in System Values), and the school bills the family later. A balance with a minus sign, like -$35.49, means the family owes that much.
How to create the statements
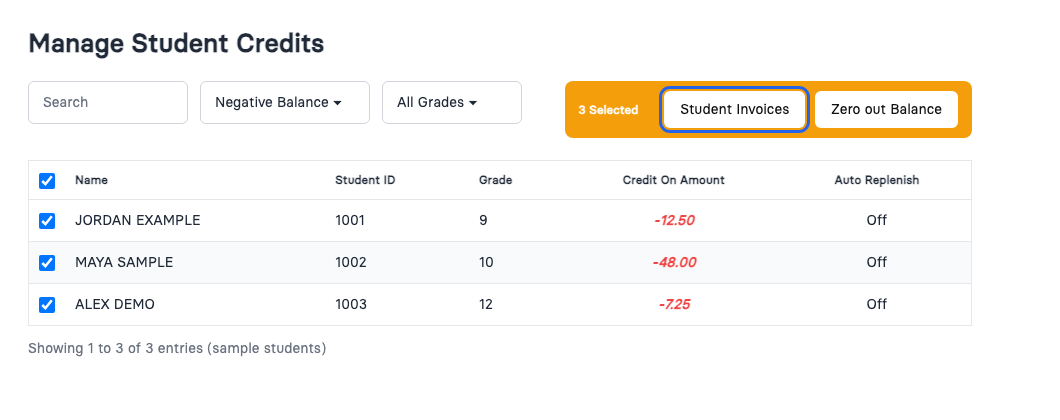
- In the Store, go to Student Credits. To bill the families who owe, set the filter to Negative Balance.
- Tick the students you want. Use the box at the top of the list to tick everyone.
- In the bar that appears, click Student Invoices.
- Choose the dates. Last month and This month so far fill them in for you.
- Choose your options (explained below), then click Create PDF.
- The PDF opens in a new tab with one page for each student, in name order. Print it or save it.
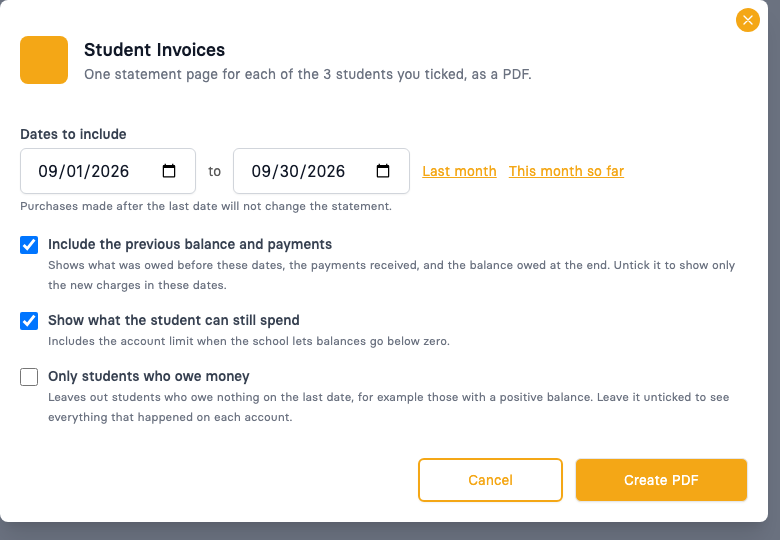
You can run last month’s statements a few days into the next month. Purchases made after the last date you choose do not change the statement.
The options
- Include the previous balance and payments (ticked by default). The statement shows the balance before your first date, the purchases, the payments or money added, and the balance at the end. Untick it to show only the new charges in your dates and their total. This is the choice for a school that keeps a running balance all year and only wants to bill the month’s purchases.
- Show what the student can still spend (ticked by default). Shows “Available to spend”. If the school lets balances go below zero, it also shows the account limit.
- Only students who owe money (unticked by default). Tick it to leave out students who owe nothing on the last date, for example students with a positive balance. Leave it unticked to see everything that happened on each account. A student with nothing at all to show (no purchases, no payments and nothing owed) never gets a blank page.
What a statement shows
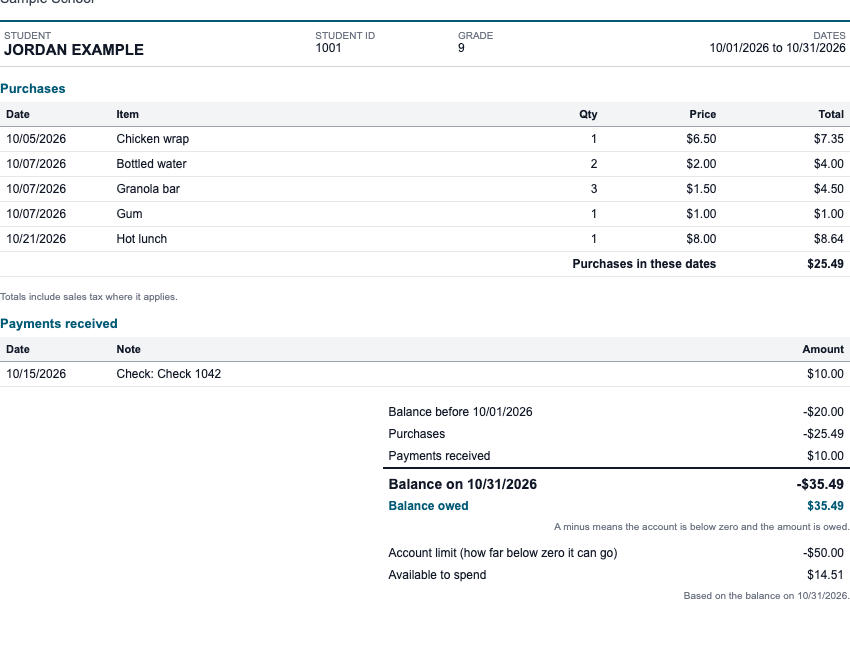
A school that bills afterwards
Each page lists the purchases and the payments received, then a short summary. The balance uses a minus sign when the account is below zero, and the highlighted line says Balance owed so a family does not have to work it out.
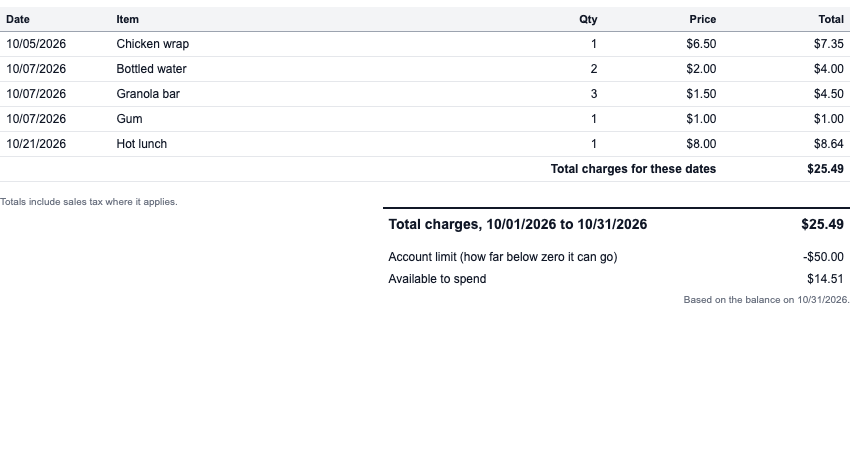
Only the new charges
With “Include the previous balance and payments” unticked, the page shows just the purchases in your dates and the total charges.
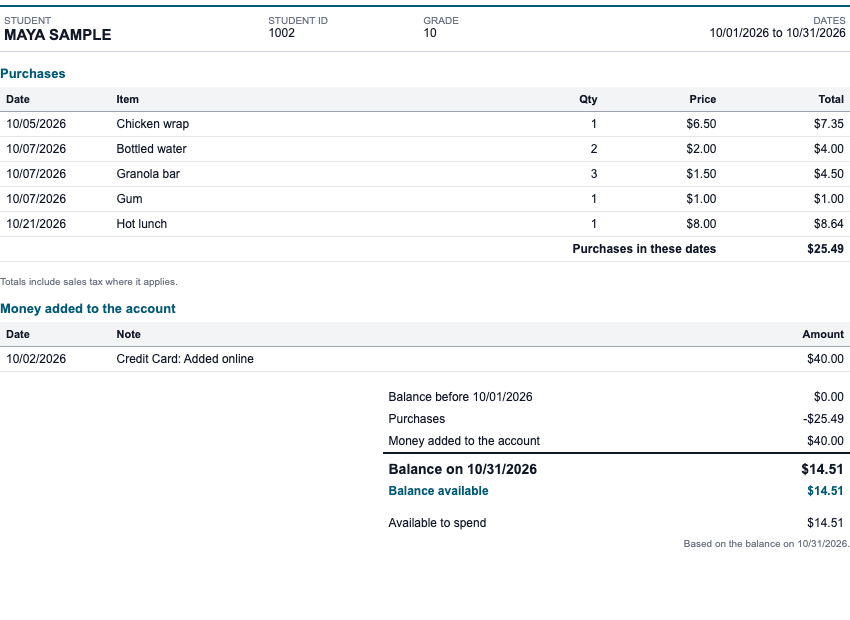
A school where families add money first
The summary says Money added to the account instead of payments, and the highlighted line says Balance available.
Good to know
- Record each payment you receive with Add Credits on the student, and put the check number in the note. That is what shows on the statement.
- Prices on the statement include sales tax where it applies.
- If a family pays only part of what they owe, the rest shows as the balance before the next month’s dates.
- If you click Create PDF and see a message that no students match, try other dates, or untick “Only students who owe money”.
Clearing balances at the end of the year
On the same Student Credits page, Zero out Balance clears accounts. It works for both kinds of balance, but only one kind at a time: tick only the students with a positive balance, or only the students with a negative balance. Zeroing out a negative balance adds back what the student owed, so the account ends at $0.00, and no payment is recorded.