
Welcome to our Knowledge Base
-
System Settings
-
- System Settings Getting Started (Video)
- Upload Students (NEW)
- Upload Students (Video)
- Upload Students
- Upload Student Pictures
- User Permissions
- SFTP Automated Student Rosters
- Microsoft Single Sign-On (SSO)
- Safari Web Browser
- System Requirements
- Whitelist URL's
- Spirit Point Reward Tracking
- Google Single Sign-On (SSO)
- Status
- Automated Intervention Extract
- Release Notes
- Show all articles (1) Collapse Articles
-
- Upload User Accounts
- User Accounts
- Upload Students
- Upload Students (Video)
- Upload Student Pictures
- User Permissions
- Manage Family and Guests
- Mass Updates
- Manage Students
- Microsoft Single Sign-On (SSO)
- Preparing for Next School Year
- Printer Setup - 3" Thermal (Windows)
- Printer Setup - 3" Thermal (Mac) **Advanced Setup**
- Printer Setup - 3" Thermal Network (Mac) **Advanced Setup**
- Google Single Sign-On (SSO)
- Classlink
- District Admin
- Upload Students (NEW)
- Show all articles (3) Collapse Articles
-
-
Store
-
- Store Setup (Video)
- Store How to Use (Video)
- Upload Students (NEW)
- Upload Student Pictures
- SFTP Automated Student Rosters
- ProPay (Heartland) Merchant Account
- Manage Spirit Points
- Store Importing Products
- Upload Students (Video)
- Upload Students
- Microsoft Single Sign-On (SSO)
- Google Single Sign-On (SSO)
-
- Changing Payment Type After Transaction has Completed
- Creating a Transaction
- E-mail Receipts
- Exporting Ticket Sales from Store to Ticketing for Checkin
- Modify Transaction - Post Sale
- Payment Type
- PAX Credit Card Reader Setup
- Portal Purchased Product Pickup and Reports
- Product Buttons
- Printing Receipts
- ProPay: How to Process Credit Cards
- ProPay: How to Void a Transaction
- Scanning a Student ID
- Returns
- Reprint Receipt and Resend Receipt by E-mail
- Student Credit
- Student Credit - Credit Refunds
- Discount Options
- Convenience Fee
- Student Alerts
- Show all articles (5) Collapse Articles
-
- Manage Products
- Barcodes
- Categories
- Configure your Portal and Products
- Inventory
- Mass Product Updates
- Mass Product Update (Video)
- Product History (Link on Current Transaction)
- Product Groups
- Product Agreement
- Store Importing Products
- Vendors
- Account Codes
- Duplicate Product
- Store Imports
- Student Alerts
- Show all articles (1) Collapse Articles
-
- Family and Guest Management
- Manage Spirit Points
- Manage Students
- Manage Family and Guests
- Mass Updates
- Student Credit
- Student Credit - Credit Refunds
- Discount Options
- Student Type
- Managing Student Credit
- Student Spirit Points
- Upload Students
- Upload Student Credit
- Upload Student Pictures
- Upload Students (Video)
- Add Students
- Student Negative Account Balance
- Student Alerts
- Upload Students (NEW)
- Show all articles (4) Collapse Articles
-
- Accessing the Student Only Store Portal
- Accessing the Open Store Portal
- Configure your Portal and Products
- Family and Guest Management
- Google Single Sign-On (SSO)
- Family Portal
- ProPay (Heartland) Merchant Account
- Manage Family and Guests
- Microsoft Single Sign-On (SSO)
- Portal Purchased Product Pickup and Reports
- Convenience Fee
-
- Accessing the Student Only Store Portal
- Accessing the Open Store Portal
- Configure your Portal and Products
- Cash Drawer (Connected to Thermal Printer)
- Cash Drawer (USB) Windows 10
- ProPay (Heartland) Merchant Account
- My Account
- PAX Credit Card Reader Setup
- Portal Purchased Product Pickup and Reports
- Product History (Link on Current Transaction)
- Product Agreement
- SFTP Automated Student Rosters
- School Logo
- Taxes
- User Accounts
- User Permissions
- Upload User Accounts
- Whitelist URL's
- Pay Open Invoice by Credit Card
- Account Codes
- Renewal
- Store Imports
- Show all articles (7) Collapse Articles
-
- System Settings Getting Started (Video)
- Mass Updates
- ProPay (Heartland) Merchant Account
- PAX Credit Card Reader Setup
- Google Single Sign-On (SSO)
- Microsoft Single Sign-On (SSO)
- School Logo
- User Accounts
- Preparing for Next School Year
- Remote Support
- Upload Student Pictures
- User Permissions
- Upload User Accounts
- Convenience Fee
- Classlink
- Account Codes
- Show all articles (1) Collapse Articles
-
-
Voting
-
- Adding an Election
- Adding Candidates
- Adding Officer Positions
- Adding Pictures and Biographies
- Archive and Retrieve Old Elections
- Create a Survey (Video)
- Election Layout Options
- Duplicate an Election
- Election Preflight
- Preview an Election
- Removing Candidates
- Using Video Biographies
- Write-in Candidates
- Rank Choice Voting
-
- Configure the Student Login Page
- Hobbies and Biography
- My Account
- Notifications for Unsuccessful Student Login Attempts
- Require Student E-mail
- Require Change Passwords
- SFTP Automated Student Rosters
- School Logo
- User Accounts
- User Permissions
- Upload User Accounts
- Whitelist URL's
- Pay Open Invoice by Credit Card
- Renewal
-
Ticketing
-
- Add Event
- Ticketing Attendance Report
- Check-In
- Display all Events
- Event Types
- Exporting Ticket Sales from Store to Ticketing for Checkin
- Mobile Check-in
- Pre-load Event
- Spirit Point Reward Tracking
- Sell Tickets
- Ticket and Check-in
- Link Store Ticket Sales to Ticketing 4 Schools
- Sell Tickets (New)
- Duplicate Event
-
- System Settings Getting Started (Video)
- Mass Updates
- ProPay (Heartland) Merchant Account
- Microsoft Single Sign-On (SSO)
- Google Single Sign-On (SSO)
- Upload Student Pictures
- User Accounts
- User Permissions
- Upload User Accounts
- School Logo
- Preparing for Next School Year
- Remote Support
- Classlink
- Convenience Fee
-
Interventions
-
- Bell Schedules
- Interventions
- Mass Updates
- My Account
- Printer Setup - 3" Thermal (Windows)
- Printer Setup - 3" Thermal (Mac) **Advanced Setup**
- Printer Setup - 3" Thermal Network (Mac) **Advanced Setup**
- SFTP Automated Student Rosters
- School Logo
- User Accounts
- User Permissions
- Upload User Accounts
- Whitelist URL's
- Pay Open Invoice by Credit Card
- Renewal
- Automated Intervention Extract
- Show all articles (1) Collapse Articles
-
Announcements
-
Student / Family Portal
-
Digital ID
Upload Students (NEW)
In this article, you will learn how to upload students with the new guided upload. It asks how your students sign in, matches your columns, and checks your file before anything is saved. Follow the instructions below.
You must have Super User or App Owner permission level to upload students into the application.
Prepare your file
To upload students you need a .csv, .xls or .xlsx file, up to 5 MB, with one student per row. If you use an Excel file, keep only one tab of data. The heading row can say anything and the columns can be in any order, because you match them on a later screen. A file with no heading row also works.
Possible fields to upload
Always needed
- Student ID
- First name
- Last name
- Grade
Needed for the choices you make
- Birthday (when the password is the student’s birthday)
- Password (when you use a password column)
- Email (for Google, Microsoft or ClassLink sign in)
- Voting group (Voting, only if you choose a column)
- Ticketing group (Ticketing, only if you choose a column)
- Last period location (Interventions, only if you choose a column)
The upload page shows the exact list for your choices under Your file needs.
Tip: if student IDs start with zeros (such as 00123), format the ID column as Text in Excel before you save, or Excel removes the zeros.
Open Upload Students (new)
-
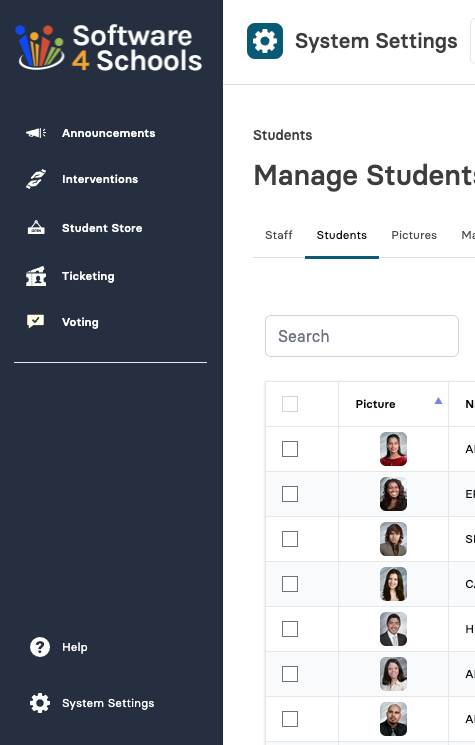
Click on System Settings
-
Next click Students to access Student Upload Feature
-
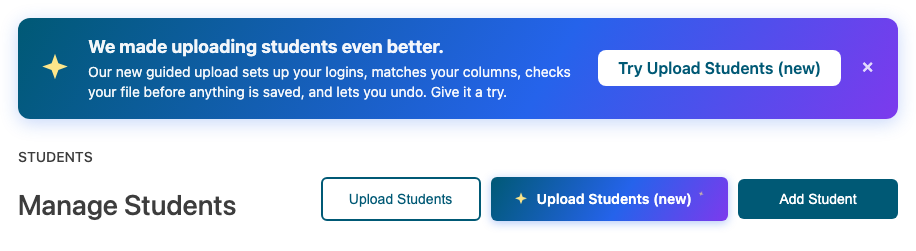
Click Upload Students (new) on the Students page. The banner at the top has the same link.
-
This is the Upload Students (new) button.
-
Prefer the old way? The Upload Students button is still here. Both work on the same students.
Step 1: Choose how your students sign in
-
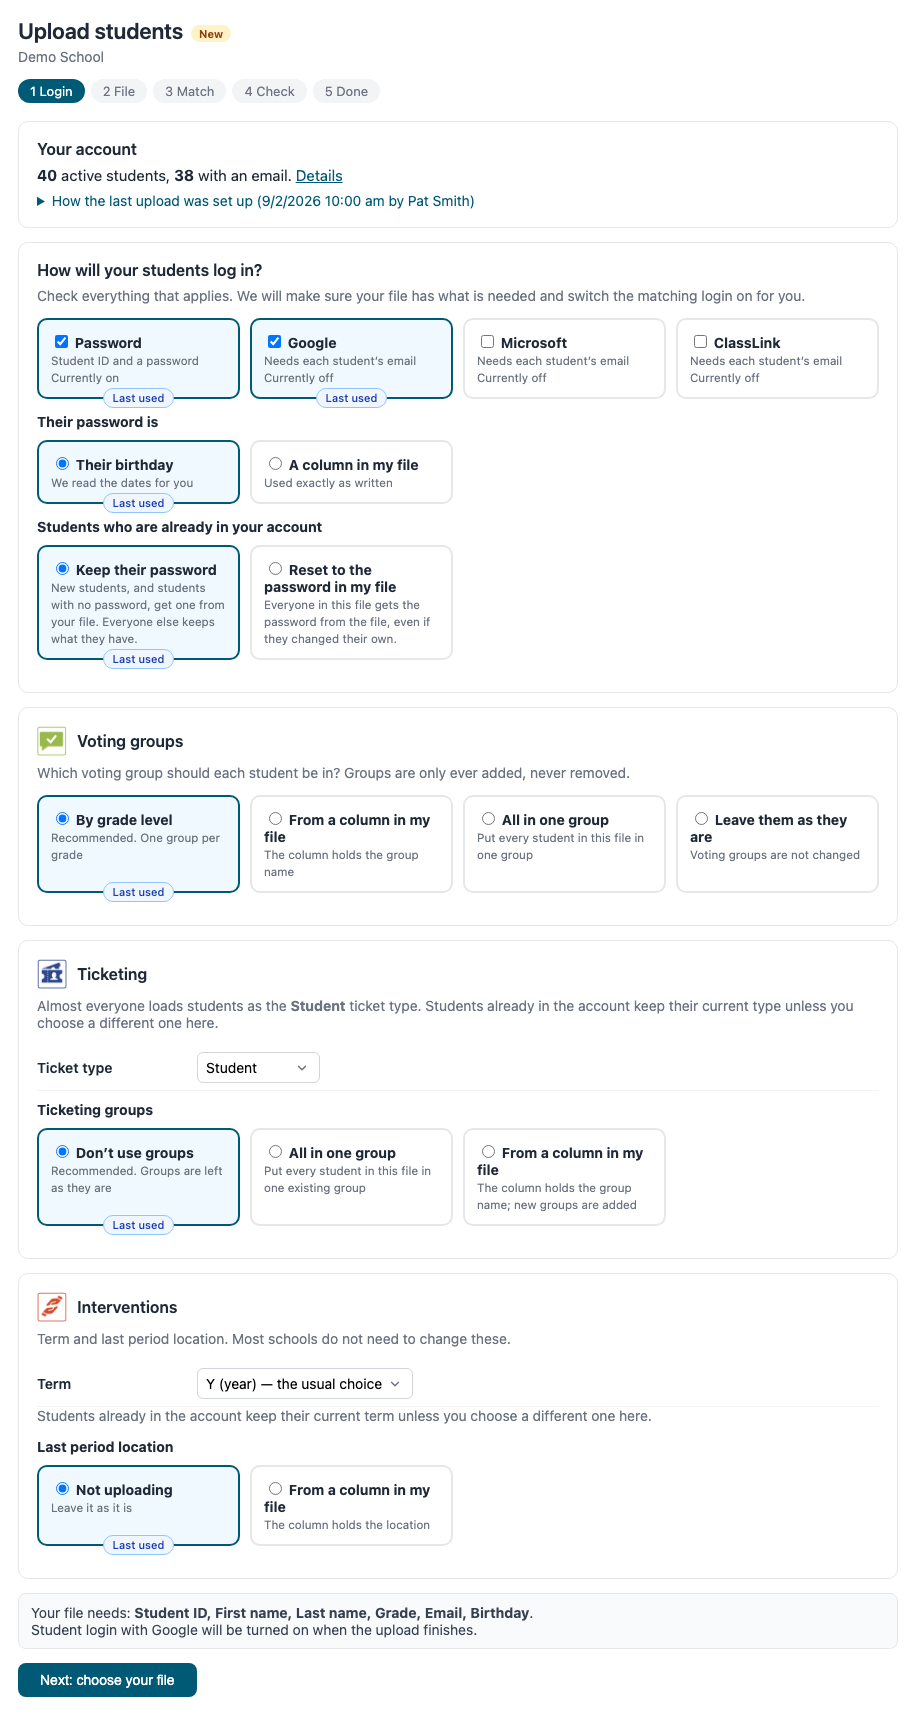
Your account shows how many active students you have and how many have an email. Click Details to see them by grade. If you have uploaded this way before, you can open How the last upload was set up.
-
Check everything that applies for how students sign in: Password, Google, Microsoft or ClassLink. Google, Microsoft and ClassLink need each student’s email in your file. When the upload finishes we switch on the logins you checked.
-
A Last used tag shows what you chose last time.
-
Their password is (when Password is checked): Their birthday (we read the dates for you, in any common format) or A column in my file (used exactly as written).
-
Students who are already in your account: Keep their password (recommended) gives new students, and students with no password, the password from your file. Everyone else keeps theirs. Reset to the password in my file gives everyone in the file the password from the file, even if they changed their own.
-
Voting groups (only if you own Voting): By grade level (recommended, one group per grade), From a column in my file, All in one group, or Leave them as they are. Groups are only added, never removed.
-
Ticketing (only if you own Ticketing): choose the Ticket type. Almost everyone uses Student. Ticketing groups only shows if the Groups setting is On in Ticketing.
-
Interventions (only if you own Interventions): the Term (Y for the full year is the usual choice) and the Last period location, which prints on call slips. Products you do not own, or that have expired, are not shown.
-
Under Your file needs you will see exactly which columns your file must have. Then click Next: choose your file.
Step 2: Choose your file
Click Choose File and select your file. We read it and take you to the next screen.
Step 3: Match your columns
-
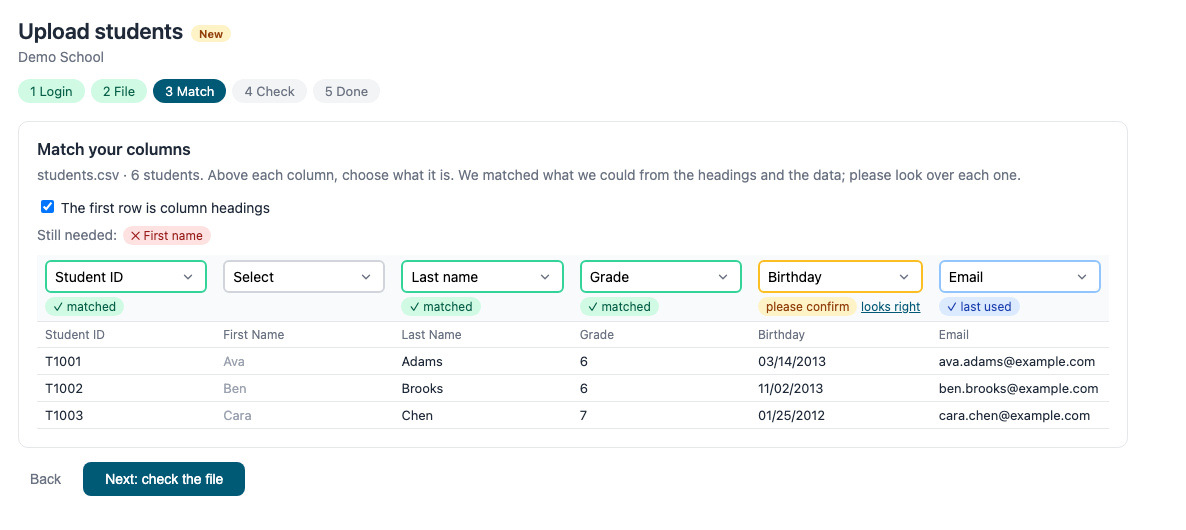
The first row is column headings: leave this checked if your first row has titles. Uncheck it if the first row is a student.
-
A red Still needed line lists what is missing. It goes away as soon as you pick that column.
-
✓ matched means we are confident. Above each column you can change what it is.
-
A yellow please confirm means we are not sure. If it is right, click looks right.
-
✓ last used means it is the same as your last upload.
-
A column we did not match shows Select. Choose what it is, or choose Not used if you do not need it.
-
Click Next: check the file.
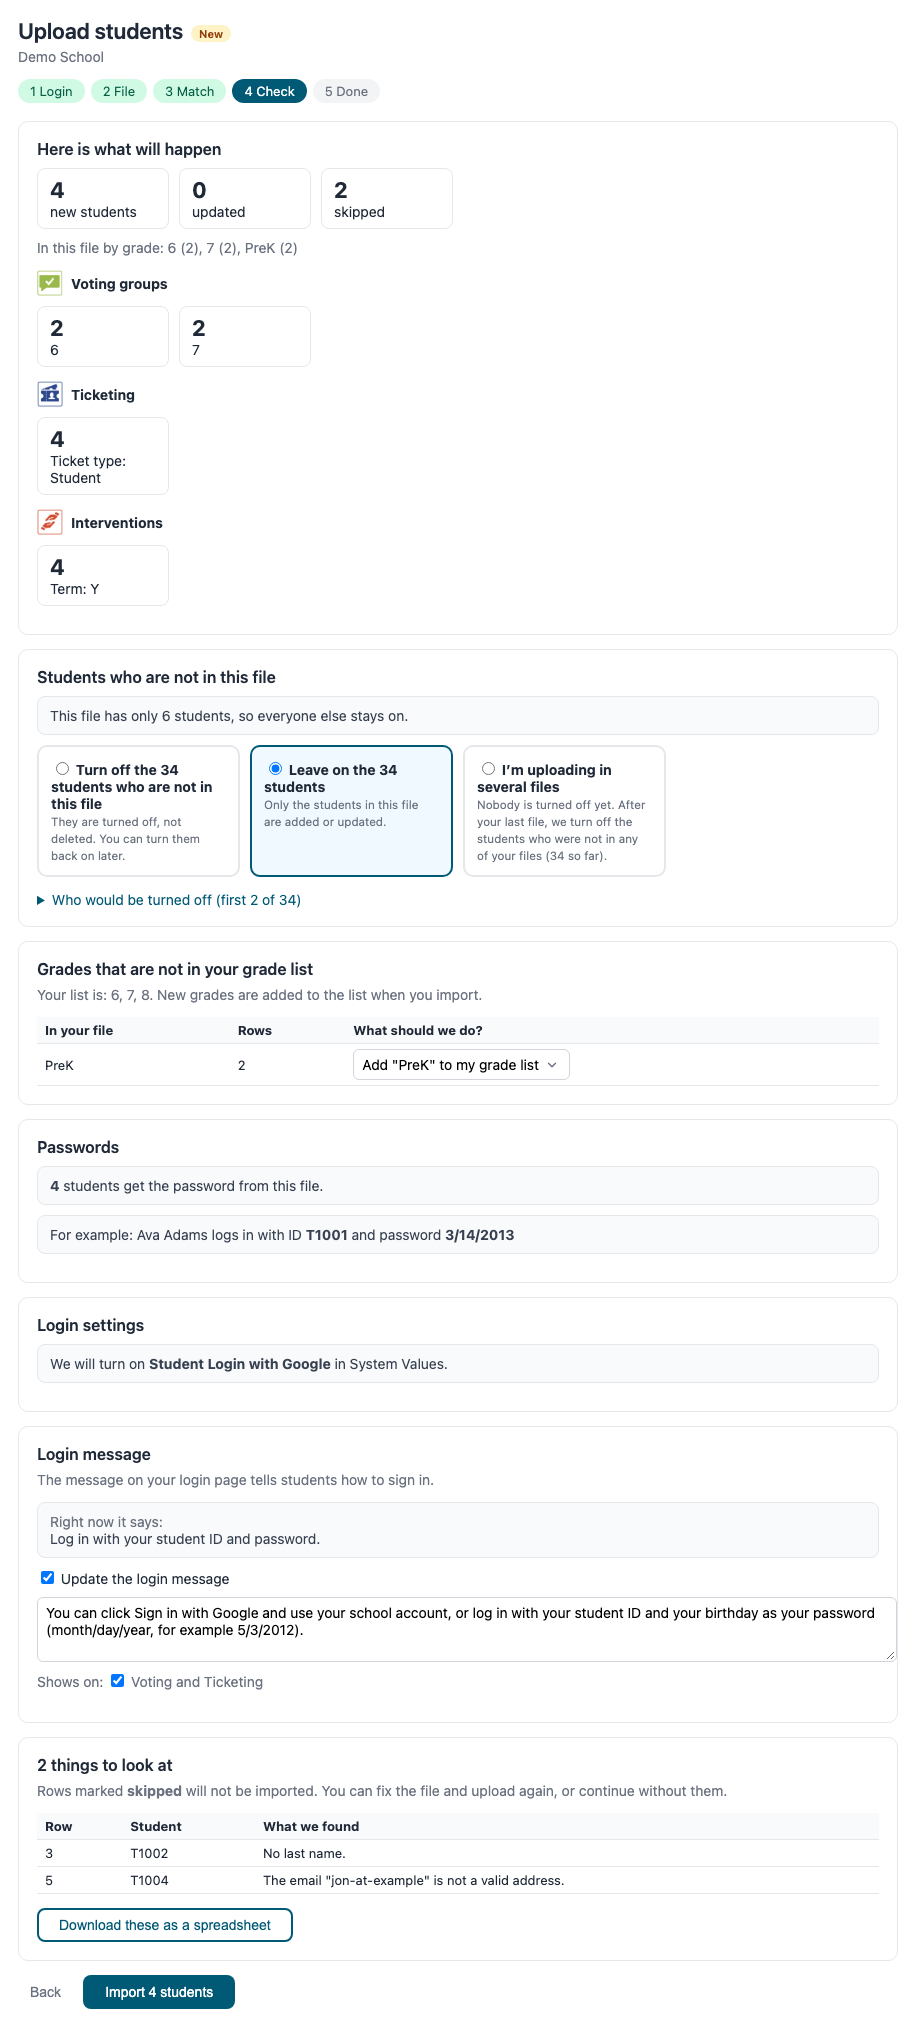
Step 4: Check the file
-
Nothing is saved yet. This screen shows what will happen: how many students are new, updated and skipped, and what each product will get.
-
Students who are not in this file. Turn off the students who are not in the file (they are turned off, not deleted, and you can turn them back on), Leave on everyone else, or choose I’m uploading in several files. Click Who would be turned off to see the names. We warn you if it is more than a quarter of your students.
-
Grades that are not in your grade list. For each one choose Add it to your grade list, Change to a grade you have, or Skip these rows.
-
Passwords. Shows how many students get the password from your file, with an example of what a student types. If your file has day-first dates (13/02/2012) we tell you and read them that way.
-
Login settings. Shows which logins will be turned on. You can also tick Also turn off for a login that is on now but that you did not check.
-
Login message. The message on your login pages tells students how to sign in. We suggest wording that matches your choices. Edit it, choose which apps show it, or untick Update the login message to leave it as it is.
-
Things to look at. Any row we cannot use is listed with the reason, such as no last name, a birthday we cannot read, an email that is not valid, or a student ID that is in the file twice. Those rows are skipped.
-
Click Download these as a spreadsheet to fix those rows, then upload just those rows.
-
When you are happy, click Import.
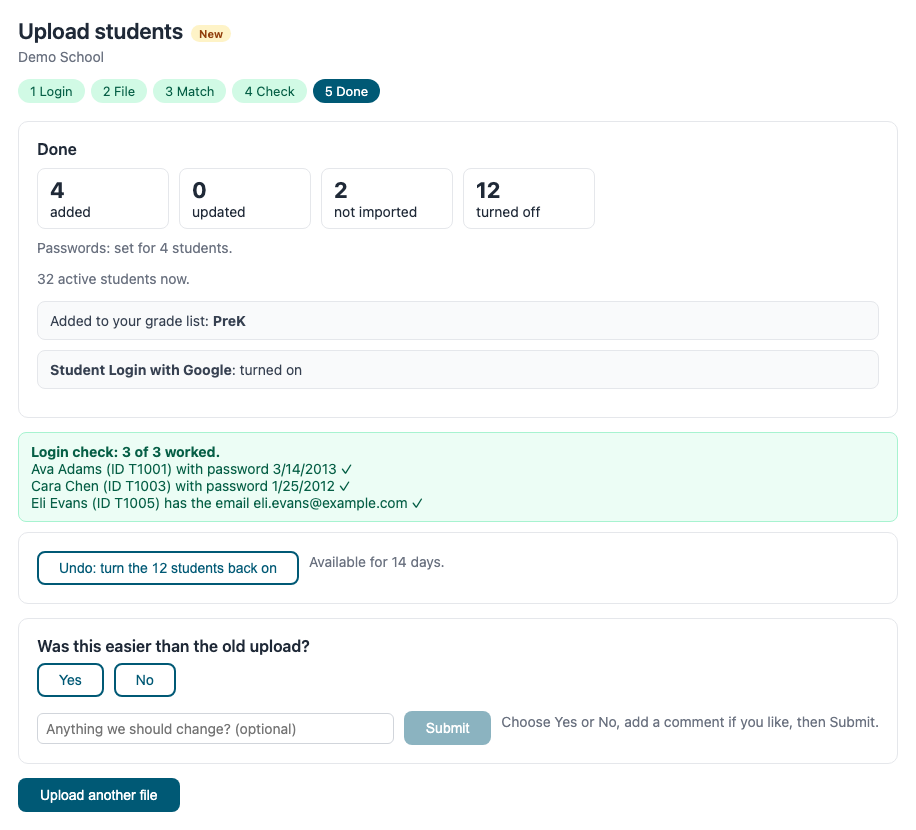
Step 5: Done
-
You see how many students were added, updated and not imported, and how many were turned off.
-
The Login check tries the password or email of a few students to make sure they can sign in. A ✓ means it worked.
-
Turned students off by mistake? Click Undo to turn them back on. It is available for 14 days.
-
Tell us if this was easier than the old upload. Click Yes or No, add a comment if you like, then click Submit.
-
Click Submit to send your feedback.
-
Click Upload another file to start again.
Uploading in several files
If your students come in more than one file (for example, one per grade):
- For the first file, choose I’m uploading in several files on the check screen, then import it.
- On the Done screen click Add another file and repeat for each file.
- When all your files are loaded, click I’m done with all my files.
- We show how many active students were in none of your files. Choose Turn them off or Keep them.
Common questions
A student’s password does not work
Check the date format in your file. If your dates are day-first (13/02/2012), the check screen tells you. Students type the birthday as month/day/year, for example 2/13/2012.
We want to reset students’ passwords
On the first screen, under Students who are already in your account, choose Reset to the password in my file.
Why was a row skipped?
The Things to look at list gives the reason for every row.
A student ID lost its leading zeros
Format the ID column as Text in Excel and upload again. We warn you when your account has the ID with zeros and your file does not.
Does this change my nightly roster (SFTP) or ClassLink rostering?
No. If you use an automatic roster, check with your IT team before you also load students by hand.
Can I still use the old upload?
Yes. Click Upload Students. Both work on the same students.