

Welcome to our Knowledge Base
Upload Students (NEW)
-
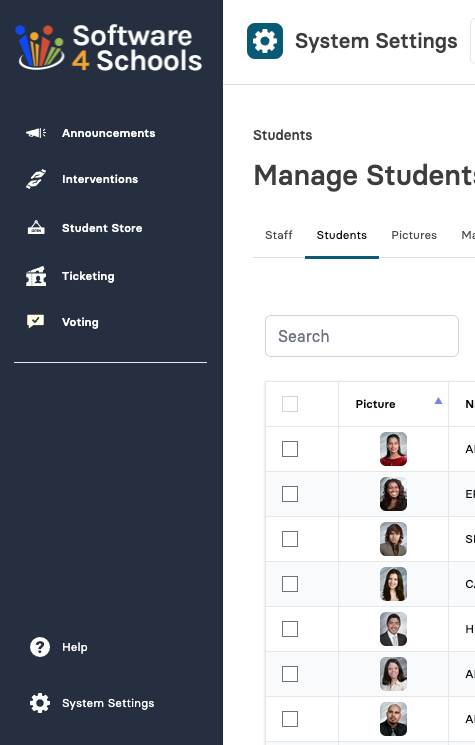
Click on System Settings
-
Next click Students to access Student Upload Feature
-
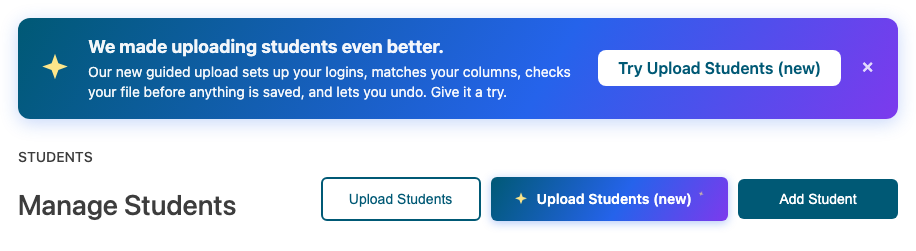
Click Upload Students (new) on the Students page. The banner at the top has the same link.
-
This is the Upload Students (new) button.
-
Prefer the old way? The Upload Students button is still here. Both work on the same students.
-
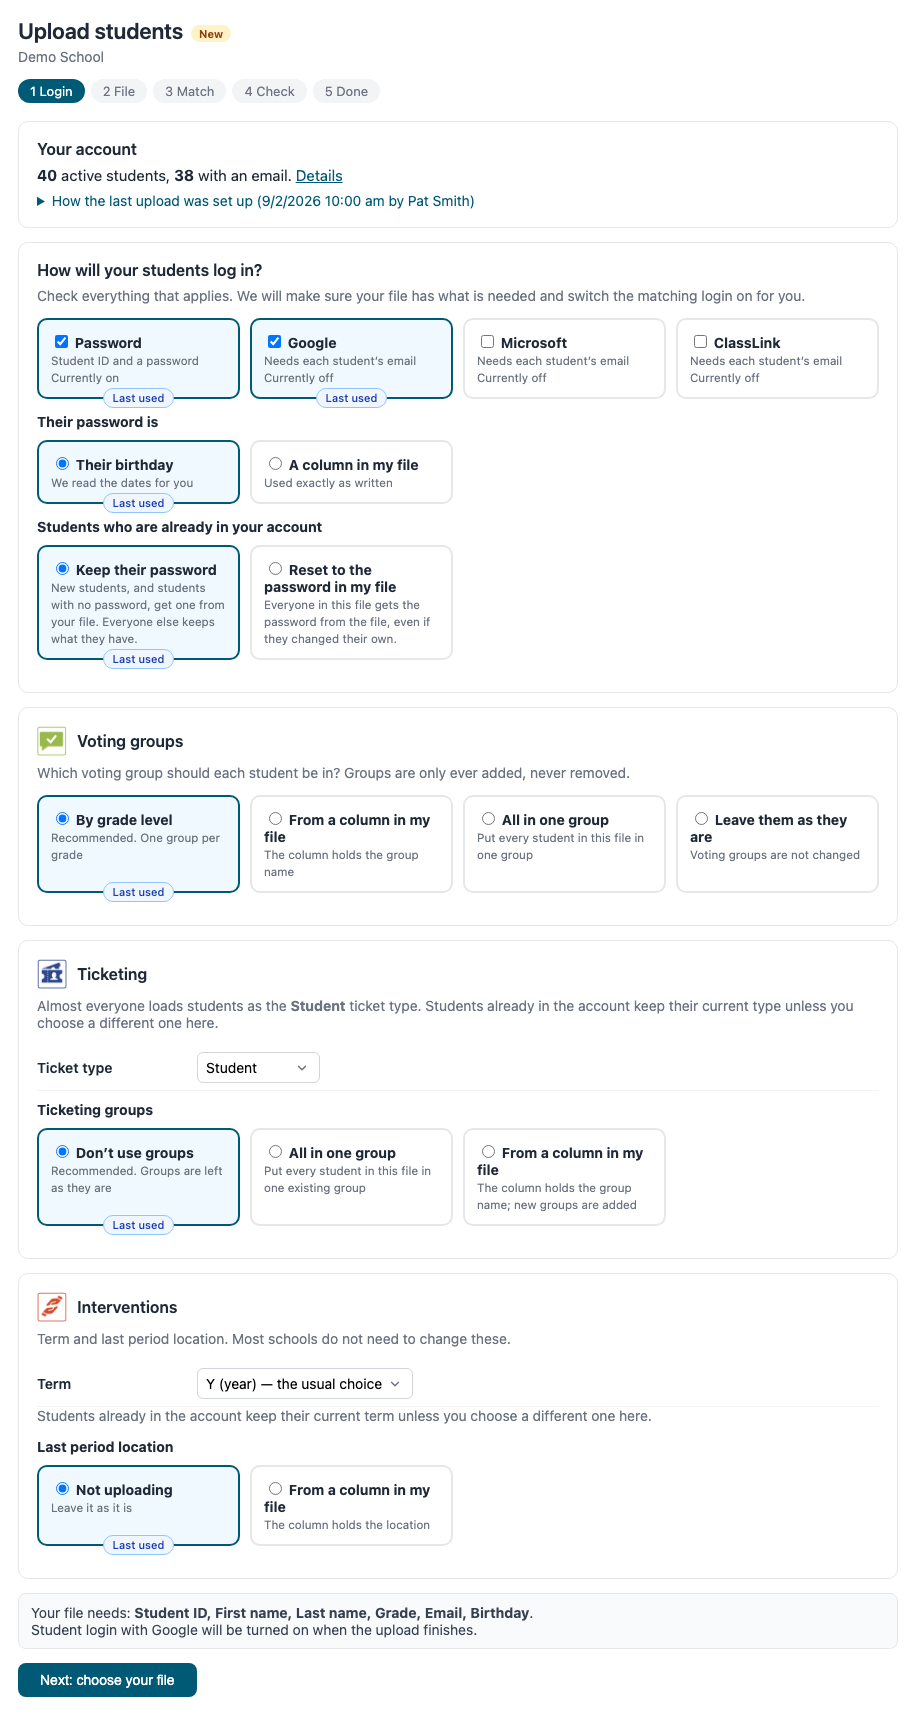
Your account shows how many active students you have and how many have an email. Click Details to see them by grade. If you have uploaded this way before, you can open How the last upload was set up.
-
Check everything that applies for how students sign in: Password, Google, Microsoft or ClassLink. Google, Microsoft and ClassLink need each student’s email in your file. When the upload finishes we switch on the logins you checked.
-
A Last used tag shows what you chose last time.
-
Their password is (when Password is checked): Their birthday (we read the dates for you, in any common format) or A column in my file (used exactly as written).
-
Students who are already in your account: Keep their password (recommended) gives new students, and students with no password, the password from your file. Everyone else keeps theirs. Reset to the password in my file gives everyone in the file the password from the file, even if they changed their own.
-
Voting groups (only if you own Voting): By grade level (recommended, one group per grade), From a column in my file, All in one group, or Leave them as they are. Groups are only added, never removed.
-
Ticketing (only if you own Ticketing): choose the Ticket type. Almost everyone uses Student. Ticketing groups only shows if the Groups setting is On in Ticketing.
-
Interventions (only if you own Interventions): the Term (Y for the full year is the usual choice) and the Last period location, which prints on call slips. Products you do not own, or that have expired, are not shown.
-
Under Your file needs you will see exactly which columns your file must have. Then click Next: choose your file.
-
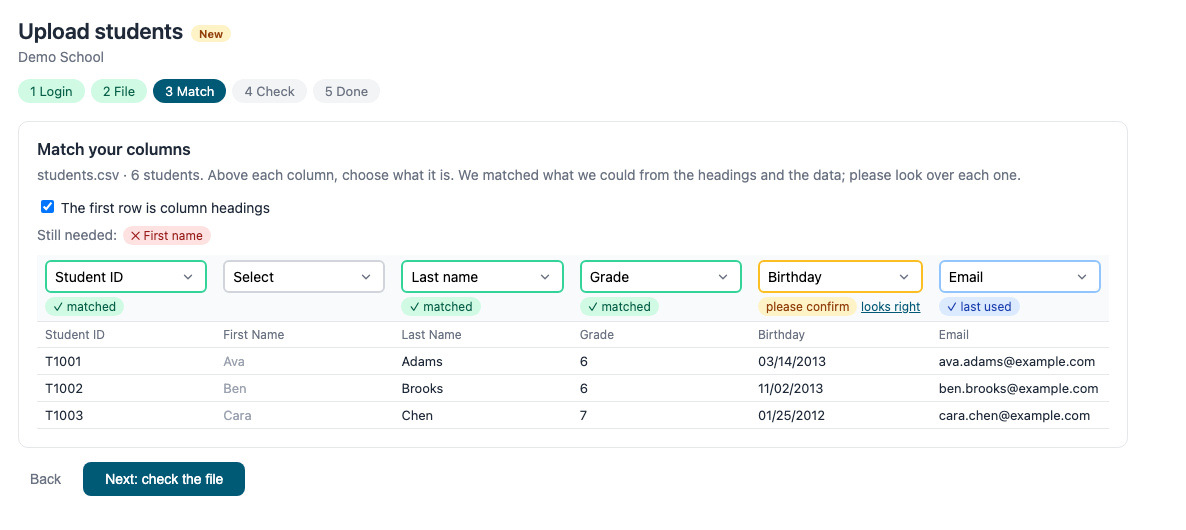
The first row is column headings: leave this checked if your first row has titles. Uncheck it if the first row is a student.
-
A red Still needed line lists what is missing. It goes away as soon as you pick that column.
-
✓ matched means we are confident. Above each column you can change what it is.
-
A yellow please confirm means we are not sure. If it is right, click looks right.
-
✓ last used means it is the same as your last upload.
-
A column we did not match shows Select. Choose what it is, or choose Not used if you do not need it.
-
Click Next: check the file.
-
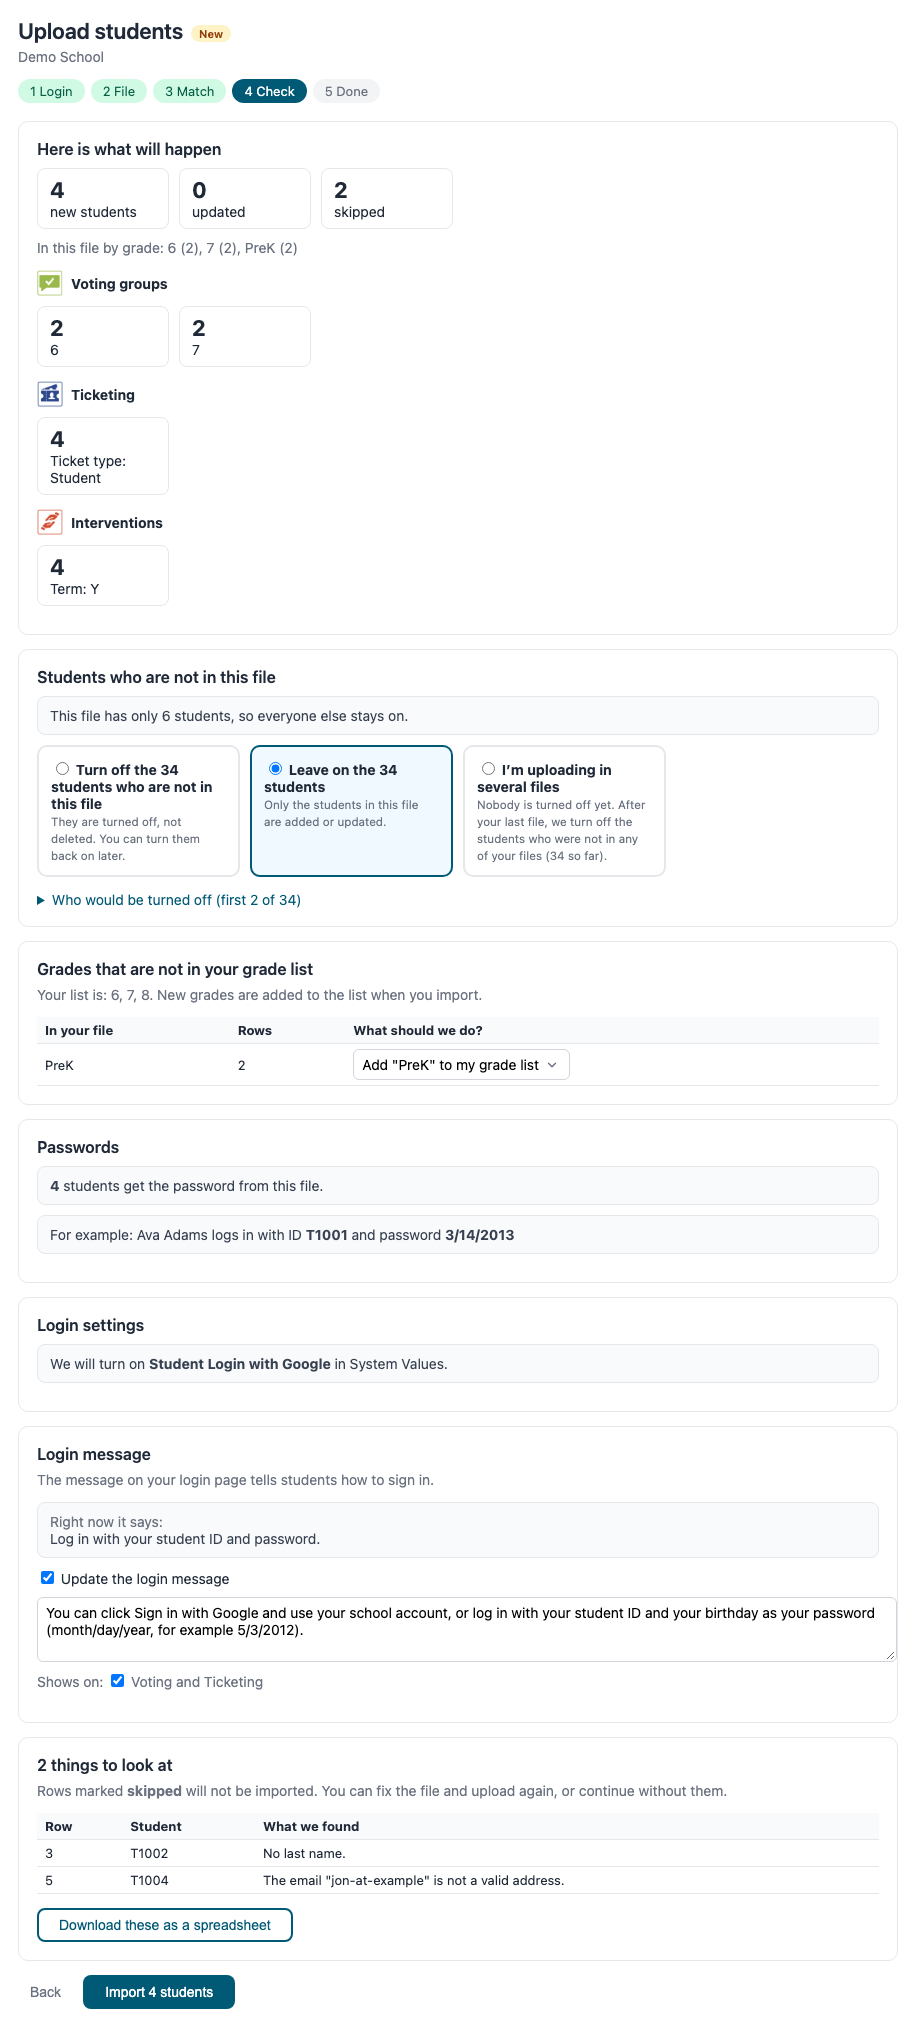
Nothing is saved yet. This screen shows what will happen: how many students are new, updated and skipped, and what each product will get.
-
Students who are not in this file. Turn off the students who are not in the file (they are turned off, not deleted, and you can turn them back on), Leave on everyone else, or choose I’m uploading in several files. Click Who would be turned off to see the names. We warn you if it is more than a quarter of your students.
-
Grades that are not in your grade list. For each one choose Add it to your grade list, Change to a grade you have, or Skip these rows.
-
Passwords. Shows how many students get the password from your file, with an example of what a student types. If your file has day-first dates (13/02/2012) we tell you and read them that way.
-
Login settings. Shows which logins will be turned on. You can also tick Also turn off for a login that is on now but that you did not check.
-
Login message. The message on your login pages tells students how to sign in. We suggest wording that matches your choices. Edit it, choose which apps show it, or untick Update the login message to leave it as it is.
-
Things to look at. Any row we cannot use is listed with the reason, such as no last name, a birthday we cannot read, an email that is not valid, or a student ID that is in the file twice. Those rows are skipped.
-
Click Download these as a spreadsheet to fix those rows, then upload just those rows.
-
When you are happy, click Import.
-
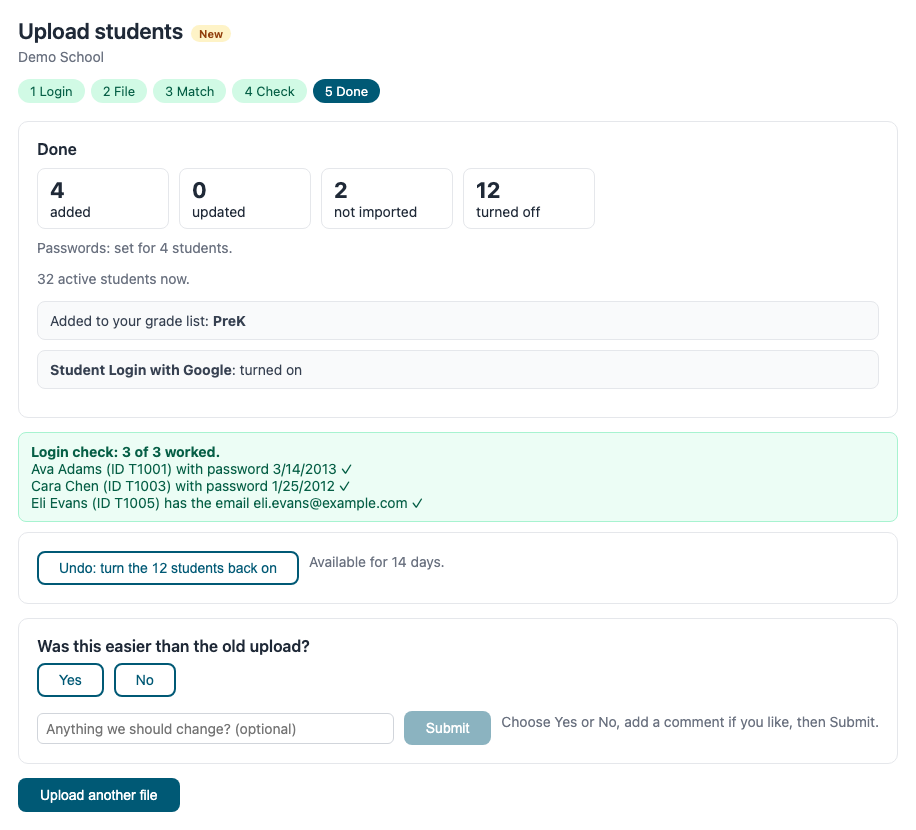
You see how many students were added, updated and not imported, and how many were turned off.
-
The Login check tries the password or email of a few students to make sure they can sign in. A ✓ means it worked.
-
Turned students off by mistake? Click Undo to turn them back on. It is available for 14 days.
-
Tell us if this was easier than the old upload. Click Yes or No, add a comment if you like, then click Submit.
-
Click Submit to send your feedback.
-
Click Upload another file to start again.